Time-stamp:<>
SECTION 1
ABOUT THIS BOOK
1.1
THE GOAL OF THIS BOOK
Reading this book will not turn you into a world champion auto
racer. It can help you become a better, safer driver whether you are
driving on the race track or on public roads. Unlike many books on
driving, this one was explicitly designed to be used in conjunction
with a
performance driving
school, taught at a racetrack. This book is designed to give you the
background that you need to get the most from every minute of
tracktime without going into so much detail that it would take forever
to read. It is meant to be an introduction to performance driving, not
the definitive text. There are many excellent in-depth books on the
subjects of
performance driving
, racing, and race car preparationand the material in them should be
helpful for any one who wants to continue improving their driving, or
progress on to racing.
Even if you are not planning on taking a driving school at a
racetrack, this book can help you improve your driving on the
street. The principles are the same, even if the opportunities to
safely explore the limits of handling aren’t.
1.2
STRUCTURE OF THIS BOOK
This book has eight major sections.
Section 1 ABOUT THIS BOOK
Section 2 BASIC PRINCIPLES
Section 3 ABOUT THE TECHNIQUES
Section 4 ABOUT THE ROAD
Section 5 ABOUT THE DRIVER
Section 6 ABOUT THE SCHOOL
Section 7 COURSE AND TURN DESCRIPTIONS
������������������������������������������
GLOSSARY
The
ABOUT THE CAR
section considers the subjects of traction and weight transfer. It
also touches on gears and gear choices and braking. Some familiarity
with the basic physics involved will make it easier to understand why
things work the way that they do.
The
ABOUT THE TECHNIQUES
section discusses how to get the car to do what you want it to.
Knowing the proper
line
is only part of the battle, you must beable to make the car drive that
line
.
������������������
The
ABOUT THE ROAD
section describes how and where to position the car on the road, what
is a
line
, what is a good
line
, why some
line
s are better than others, how to select the best
line
and combination of
line
s.
The
ABOUT THE DRIVER
section discusses those things that affect the driver and his/her
state of mind. Things that will improve or hinder your mental,
emotional or physical state on the track.
This book is meant to be used in conjunction with a driving
school. The
ABOUT THE SCHOOL
section discusses special considerations to be taken into account by
both the students and the faculty.
IMPROVING YOUR DRIVING
discusses analyzing your own driving so that you continue to improve
after you no longer have the supervision of an instructor.
There is also a
GLOSSARY
in the
APPENDIX.
If you run across a word or phrase that you do not understand, look it
up before you continue.
1.3
HOW TO USE THIS BOOK
There are two sides to driving skill; knowing what to do, or the
intellectual, and the physical ability to do it, or the
kinesthetic. Knowing the
line
perfectly won't make you go anyfaster, if you can't actually drive
it. Having perfect car control won't make you go faster if you
consistently, deliberately, put the car in exactly the wrong place on
the track.
By learning and understanding the underlying principles of what you
should do before you get to the track, you will be able to devote your
full attention to learning how to do it once you get there.
While this book can be read in a single sitting, there is too much
material to absorb all at once. Give yourself several evenings so you
can read and understand a little at a time before going on to the next
section. Better yet, first scan through the book to familiarize
yourself with its overall contents, then go back and read each section
carefully, concentrating on a little bit at a time.
Treat this book as you would any textbook. Make notes and write
questions in the margins and on the diagrams...then when you learn the
answers, write them in next to the questions. If you do not obtain
this book in time to study it fully before getting to the track, read
the sections on
Line
(sub-section 3.1),
Attitude
(section 5.2.2) and
Flags and Signals
(section 6.2). You will also find it helpful to learn some of the
terms in the glossary.
1.4
A REQUEST FOR YOUR HELP
At the back of the book there is a short questionnaire. I need your
input to help me improve future editions. Your cooperation in passing
along your honest opinions will be appreciated.
Larry Colen
Felton, California
July 2003
SECTION 2
THE CAR
2.1
A SHORT NOTE BEFORE THIS SECTION
This chapter explains the basic physics behind balance, weight
transfer and traction. Many people find that this helps them get a
better feel for what is happening to the car as they perform the
various techniques described in this book. Other people are not as
interested in why taking their foot off the gas will cause the car to
turn more, it is enough for them to know that it does. I have
attempted to take an inherently complicated subject and present it in
the simplest possible terms. Read over this section. If you are the
sort of person who enjoyed their science classes in school, you will
probably find that it helps you understand why the techniques
described in the following sections work. If, on the other hand, it
just makes your brain hurt, skip on to the next section and don
’t worry about it.
Before I continue, I ’d like to give a quick explanation of the
drawings that I use in this section, or "What do all those funny
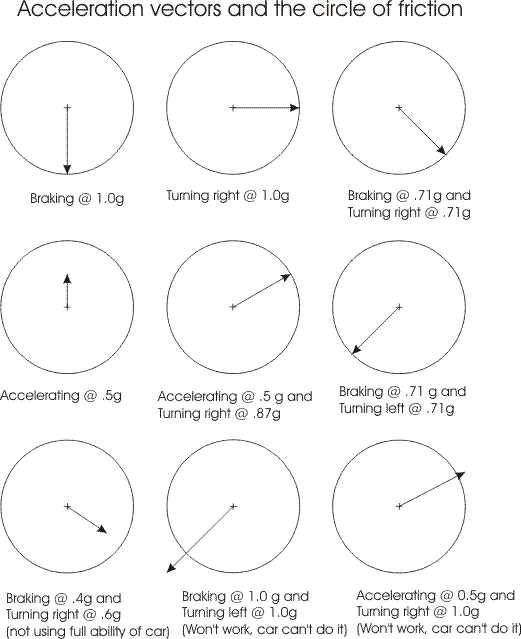
circles and arrows mean?"
The circles represent a concept called the "
Circle of friction
". If the circle is just by itself, or is drawn in the middle of a car
it represents the overall ability of the tires of the car to
accelerate, brake or turn. The arrow represents what the driver is
trying to make his car do. If the arrow is pointing forward he is
accelerating, backward he is decelerating, to the side he is
turning. If the arrow is completely inside the circle, the tires can
do what the driver is attempting. If the head of the arrow falls
outside of the circle, the tires will not be able to do what the
driver is attempting and one or more of the tires will
skid
.
If the driver is trying to accelerate (or brake) and turn at the same
time, the arrow will point at some angle that is not exactly either
front-back or to the side. To figure out what the arrow would be, draw
an arrow showing the forwards
acceleration
, now draw an arrow perpendicular to it showing how hard of a turn the
driver is trying to make. Draw two more lines that complete a box made
out of the first two arrows. Now draw an arrow that starts at the
corner of the box in the middle of the circle and which ends at the
corner of the box diagonal to the base of the arrow.
The term accelerate just means to change the velocity, either the
speed or the direction, of the car. So any time a car speeds up, slows
down or turns it is accelerating in some direction. The arrow is the
acceleration
vector. The direction that it points is the direction the car is
accelerating. The length is how hard the car is accelerating.
When I draw the circles at the corners of the car, they represent the
weight on each tire. The bigger the circle, the more weight there is
on that tire. Since more weight on a tire gives it better grip, these
circles can also be looked at as the
Circle of friction
for each tire. If a driver is trying to turn at one g and his front
tires can take 1.1 g of
acceleration
, but his rear tires can only take 0.9 g of
acceleration
, then the
acceleration
vector on the front wheels will be inside their circle of friction and
they will grip. The
acceleration
vector for the rear tires, however, will be outside their circle of
friction and the rear tires will
skid
possibly causing the car to spin out, this condition is called
oversteer
.
2.2
TRACTION, WEIGHT TRANSFER AND THE CIRCLE OF FRICTION
Ultimately, your tires determine the limits of your car's
handling. There is a concept used for describing the potential ability
of a tire. A circle which has a radius equal to the maximum force that
can be generated by friction between the tire and the road is known as
"the
circle of friction
".
For the sake of simplicity let's say that the tire can exert one pound
of sideways force for every pound of vertical force pushing down on
it. This is a somewhat simplified explanation of the technical term
referring to the tires ability to take one g. (If one pound of
downward force would only allow a tire to exert one-half pound of
sideways force (before the tire started
skidding
) it would be said to take one half or 0.5 g. In our simplified
example we will assume that the tire can sustain one g, accelerate at
one g (engine allowing), or turn at one g. If however, you are braking
at .7g, there is only about .7g left over for turning. (This is where
you could use the high school trig that you never paid any attention
to). Likewise if you are turning at .8g only .6g remain for
acceleration
. (Use the Pythagorean theorem to make the math work out)
This means that if you go hot and heavy into a turn, using all of the
tire's threshold braking ability right on the verge of lockup, and you
crank your steering wheel hard over your car will... continue to go
straight. There will be nothing left of the tires' abilities to make
the car turn.
There is another aspect to the friction circle. The friction circle
for each tire has a different size and shape which can be changed by
driving technique. But there is a catch: What you give to one is
taken from another.
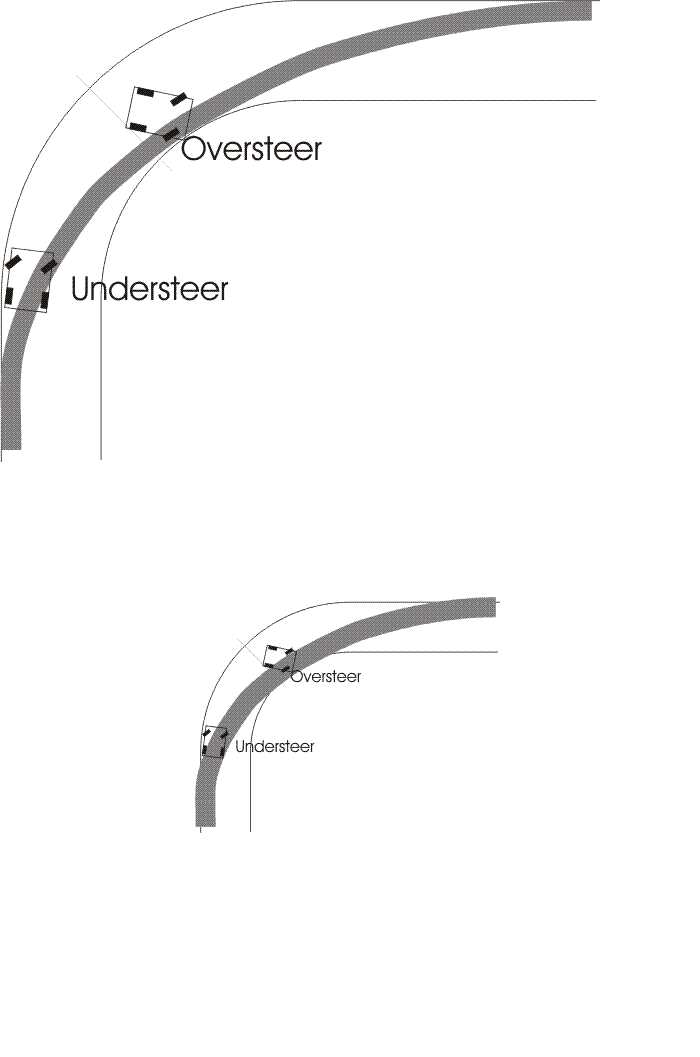
For instance, the more force pressing down on the tires, the stronger
their grip on the road. The downward force is varied is by braking or
accelerating. When you brake, the car's weight shifts forward, putting
more weight on the front tires while taking weight from the rear
tires. This means that while the front tires hold better, the rear
tires hold less well, and the car has a tendency to
oversteer
. Similarly, accelerating shifts the weight to the back, causing a
tendency to
understeer
. (See section 4.6.4 for an explanation of under- and
oversteer
.)
So far the discussion has assumed a state known as "static"
friction. If you are trying to slide something, it takes a lot of
force to get it to move, but a lot less force to keep it
sliding. Under normal conditions, your tires are in a state of
"static" friction with the road. However, when they "break free" they
then go into a state of sliding friction where it takes much less
force to keep them sliding. This is why when you lose it, it seems to
happen all at once. The force keeps building up until it exceeds the
limit by a little bit. Then, all of a sudden, it is way above the new
limit and Whee! Your rear end comes around to ask you what you
thought you were doing.
Of course, if your car has enough
torque
, tromping on the gas causes whichever wheels are driving to start
spinning, losing traction at that end and causing the car to either go
straight off the road if it is a front-wheel drive car, or spin out if
it is a rear-wheel drive car.
<DIAGRAM circle>
Speeding up, slowing down, turning, and going up or down hill each
accelerate the car in some direction. When a car accelerates, weight
(and therefore traction) is taken away from the tires in the direction
that the car is accelerating toward and given to the tires the car is
accelerating from.
When cornering, weight is transferred from the inside wheels to the
outside wheels. During hard cornering, one of the inside wheels will
actually lift off the ground. If the suspension binds or bottoms out,
both inside wheels could leave the ground. When there is little or no
weight on the inside tires, especially in cars with stock suspensions
and performance tires, you can sometimes put them past the edge of the
pavement at the
apex
of the turn without losing traction.
When a car is speeding up, weight is transfered to the rear
wheels. Since the rear wheels always point the same direction as the
car (unless something has gone horribly wrong) the car will be more
stable. This is the reason behind the old adage "When in doubt, gas
it". Remember,
acceleration
is your friend.
When a car is slowing, weight is transferred to the front wheels,
making the car turn more. If overdone (especially in the rain) this
will cause the car to
oversteer
, or spin out.
When a car starts up a hill, or reaches the bottom of a hill, it is
suddenly accelerated upward. This transfers the weight to tires on
the underside of the car. Since all of the tires should be on the
underside of the car, they will all work better allowing more traction
than on the flat.
On the other hand, when a car crests a hill, weight is transferred
away from the tires and the car will not have as much traction as on
the flat.
SECTION 3
ABOUT THE ROAD
3.1
LINE
The path taken through a turn is known as the
line
. There are many possible
line
s througha turn (watch a beginner session at one turn to get an idea
how many), but there are very few correct
line
s through a turn (watch professional racers take the same
turn). Schools usually teach what is known as the qualifying
line
, the fastest, safest
line
around a racecourse without worrying about such subtletiesof racing as
passing, or keeping from being passed. This section discusses the
principles behind choosing the proper
line
.
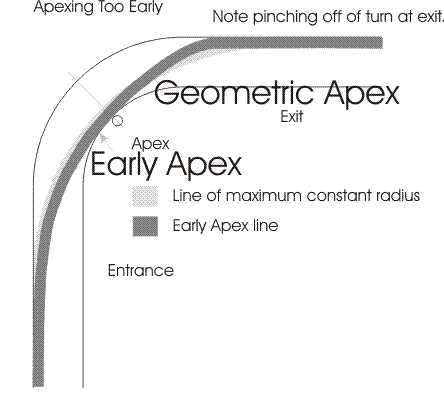
3.1.1
THE APEX
Here we come to different uses of
apex
. The word can mean where your wheels touch (or get closest to) the
inside of the turn. It can also be used to describe locations on the
turn.
The middle of the turn is known as the geometric
apex
, the area on the inside of the turn before the center is known as an
early
apex
, after the middle is a late
apex
.
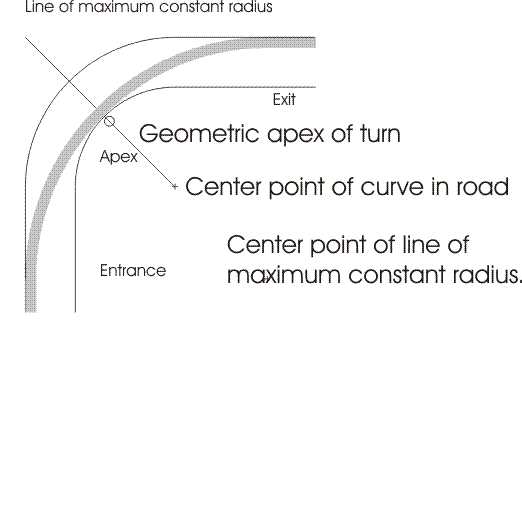
3.1.2
MAXIMUM CONSTANT RADIUS (MCR)
The first principle of maximizing speed through a turn is to make as
wide of an arc as possible. A physicist would say that
lateral
acceleration
is inversely proportional to the radius of the turn and directly
proportional to the velocity squared
. A non-physicist would say that the wider you make the turn, the
faster you can go. If you were to drive the largest possible circular
arc through a turn you could, you would be able to go through the turn
at the highest constant speed. This is the Maximum Constant Radius
(MCR)
line
.
To drive the MCR
line
, enterthe turn at the extreme outside edge of the road and turn the
wheel before the road itself turns. The inside wheels will touch the
inside of the edge of the road at the middle of the turn.
<DIAGRAM: mcr>
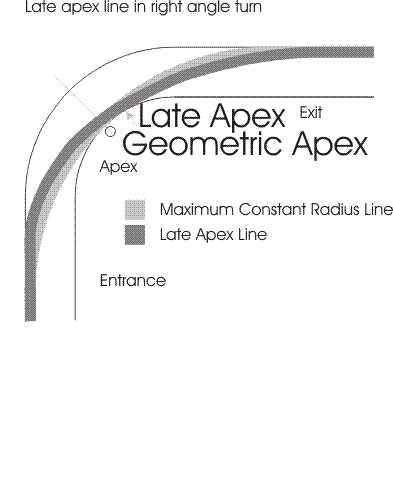
3.1.3
LATE APEX
While the MCR is the fastest
line
through a turn, maximizing the exit speed from a turn is usuallythe
fastest way to get around the track. To maximize your exit speed, you
will usually drive what is known as the
Late Apex Line
. Slow down more at the beginning than you would with a MCR
line
. This lets you to turn the car more sharply at thebeginning of the
turn so you can make the later part of the turn wider. The wider turn
means that at the same limit of handling the car can be going
faster. Two ways of telling how well this works is to notice that you
can start accelerating while you are still in the turn, usually even
before the
apex
. The other way is to look at your speedometer at the exit of the turn
and see how much faster you go when you do it right.
<DIAGRAM: late>
3.1.4
VERY LATE APEX
If you
apex
too late, the car's speed will not carry it all of the way to the
outside of the track on the exit. The problem with this is you have to
slow down more at the beginning of the turn to make it to such a late
apex
.
This is done deliberately when it is desirable to exit a turn, yet
stay to the inside, for example when we decide that it is worth
sacrificing a little speed in the first portion of an ess curve, which
looks like the letter 'S',
in order to accelerate sooner and be able to exit the second turn in
the ess at a higher speed. (See section 3.3.6) It is also a common
way of setting someone up for a pass on the straightaway following a
turn.

<DIAGRAM: rtnocar>
3.1.5
EARLY APEX
If you
apex
too early, then at the end of the turn, your car will be pointing at
the outside edge of the track. And one of two things will happen: You
will drive off the outside of the turn, or have to turn the car even
tighter to stay on the track. But, if you slow down in the middle of
the turn, the transfer of weight (and hence traction) from the rear
wheels to the front could cause you to spin.
<DIAGRAM: early>
3.2
CLASSES OF TURNS
In his book,
Driving in Competition,
Alan Johnson categorizes turns as class-one, class- two and
class-three. ����������
Even the windiest race tracks actually have far more straight road
than curved. The straights are where the cars can go the fastest. It
makes sense to choose a
line
that lets you go the fastest where you spend most of your time.
Class-one turns, which lead onto straights, are therefore the most
important. Every mile an hour that you have going into a straight, you
carry all the way to the next turn, or until the car reaches its
terminal velocity. Optimize your exit speed on class-one turns.
Class-two turns are those at the ends of straights. The longer you can
carry your speed into it, the more time you can spend going faster.
Class-three turns lead to another turn. They are is important for
setting up the turn that follows. The
line
through a class-three turn should be chosen to maximize the exit speed
from the last turn in the sequence.
When planning your
line
around the track, first identify all the class-one turns and figure
out what you must do to maximize your exit speed from them. Then look
for the class-two turns and decide how deep you can carry your speed
into them, without screwing up the
line
through class-one turn thast follows. Then you should find the fastest
way through what is left.
Note that while a turn which connects two straights might be
considered both a class one and a class two turn, it should be treated
as a class one turn. It is far more important to carry the extra speed
the whole length of the straight that follows, than the short distance
between the early and late barking points.
Occasionally you will encounter an extremely long turn, such as the
Carousel (turn six) at Sears Point. On turns like this, treat the
entrance as a class-two turn, the middle of the turn as a class- three
turn to set yourself up for the exit, which you treat as a class
one-turn.
3.3
TYPES OF TURNS
3.3.1
CONSTANT RADIUS TURNS
The most basic turn is a constant radius turn which separates two
straights.
3.3.2
INCREASING RADIUS
A turn that starts out sharp, then widens out, is called an
increasing radius turn.
If you were to drive around the inside edge of the turn, you would
start with the steering wheel turned a lot (to go around a turn with a
small radius) and would straighten the wheel as you went (as if you
were going around a turn of a larger radius). Increasing radius turns
are very fast because as you accelerate, more road is available on the
exit. The fast
line
through one ofthese turns puts the
apex
earlier than it would be for a constant radius turn.
3.3.3
DECREASING RADIUS TURNS
A turn that starts out gentle but tightens up is known as a
decreasing radius turn
. These can be very nasty if you are not prepared because all of a
sudden you will find yourself running out of room at the exit of the
turn. On a decreasing radius turn,
apex
later than you would a constant radius turn.
3.3.4
ON-CAMBER TURNS
When a turn is properly banked (the outside of the turn is higher than
the inside) is called an
on-camber turn
. The slope of the road as you go around the turn will help pull the
car back down to the center of the track. Not only that, but the
centrifugal
acceleration
actually pushes the tires into the road (rather than parallel) helping
to push the tires into the road and improving the traction. An on
camber turn can be taken faster than a flat turn of the same radius.
A turn where the road starts to go up hill, at the bottom of the hill,
or where the hill gets steeper will act just like an on camber turn.
3.3.5
OFF-CAMBER TURNS
If the inside of the turn is higher than the outside, it is known as
an
off camber turn.
Everything that worked for you in an on camber turn is now working
against you. An off camber turn has to be taken slower than a flat
turn of the same radius.
Turns at the tops of hills act like an off-camber turn because all of
the weight (and traction) comes off of the wheels.
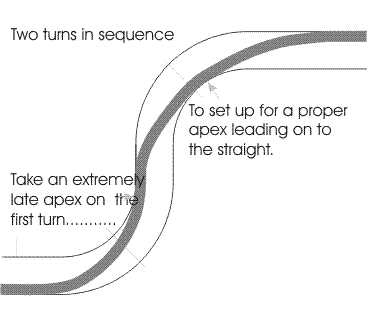
3.3.6
SEQUENTIAL TURNS
When there are two opposite direction turns immediately after each
other, sacrifice your
line
through the first one to maximze the speed through and out of the
second turn. Do this is by taking an extra-late
apex
in the first turn, which will allow you to set up on the outside edge
of the ENTRANCE to the second turn.
It is important that you let the car settle between the two
turns. Rather than turning the wheel from one direction to the other,
pause briefly in the middle when the wheel is straight.
<DIAGRAM: essflat>
SECTION 4
ABOUT THE TECHNIQUES
4.1
SMOOTHNESS
One of the most important driving skill to develop is smoothness. It
is necessary for using all of the abilities of the car without
attempting to exceed them. There is a limit to what each car can
do. When you are below that limit, you are throwing away performance
potential. When you attempt to exceed that limit, you crash. If you
are smooth, you can keep a car just below this limit. If you are not
smooth, you will approach this limit, then back off, approach it again
and back off again, or you will exceed those limits, which can mean
problems, time loss, and often major expenses. Even when you are not
near the car's limits, inconsistent and jerky driving techniques will
lower them.
The limits of adhesion are primarily dependent on the abilities of
your tires abilities to resist sliding or
skidding
. Tires do not approach a maximum and level off. They change
drastically when they go from a rolling contact with the road to a
sliding (
skidding
) contact. When a tire starts to
skid
, it instantly loses a large portion of its traction potential. A tire
that is just below the limit may be able to generate 500-pounds of
force, but when it breaks free, it may only be able to generate less
than 300.
Achieving smoothness is easier said than done. It does not mean
applying the controls slowly; it means not
changing them abruptly.
Control changes should be applied progressively. They should be
increased until they reach their maximum value, then decreased back to
zero. Watch a good driver: he will turn the steering wheel in one
motion till he is done, then bring it back to straight. A less-skilled
driver will saw at the wheel, making all sorts of adjustments
throughout the turn.
If you are not a smooth driver and you jerkily apply and release the
brakes, throttle and steering, the car will bounce as the energy is
released or stored in the springs. This bouncing will cause the
downward force on the tires to rapidly increase or decrease, suddenly
varying the tire-to-road traction. This makes it impossible for the
driver to keep the car at the edge of these rapidly changing limits.
Not being smooth getting on the brakes will make it hard to keep the
car heading straight while braking at the limits. Not being smooth
letting off of the brakes will cause the front of the car to bounce up
and down during turndown, causing the effective steering angle to
change as the front tires load and unload.
When braking is done properly, a passenger would have a hard time
feeling the exact instant that the driver starts to apply or release
the brakes.
As you learn and practice the different driving skills, always strive
for smoothness.
4.2
BRAKING
4.2.1
THRESHOLD BRAKING
Your tires generate the most force when they are just on the threshold
of losing traction in any direction, be it forward, backward or
sideways. This is as true for slowing down as it is for accelerating.
Therefore, to stop or slow down in the least distance, you must apply
the brakes as hard as you can without locking them up. If you brake
too hard, one or more of the wheels will lock up and the car won't
stop or slow down as quickly as it potentially can. You may also flat
spot (grind tread off small portions) of the tires, wasting expensive
rubber and reducing the tires abilities. On the other hand, if you
don't brake hard enough, you will have to take your foot off the gas
sooner, which leads to longer lap times. Either way, you end up
spending less time at full throttle.
It is difficult to tell when a wheel is on the verge of locking
up. (All four wheels rarely lock up simultaneously.) By noticing that
one or two wheels are about to lock up, you can ease off the brakes a
little bit and adjust the braking pressure to keep the overall braking
force at its maximum.
You can tell that your wheels are locking up by feel and by
sound. Since a
skidding
tire exerts less frictional force than one that is not
skidding
you can
feel for this loss of friction. You can also listen for the
distinctive sound of a
skidding
tire, which also tells you to ease off on the brakes till the sound
goes away.
At this threshold, note how the brake pedal, steering wheel and the
overall balance of the car feel as the car goes in and out of the
skid
. This will train you to be able to recognize an impending
lockup...before it happens.
If you are driving an open wheeled (formula) car, there is a very
simple way to tell if either of the front wheels are locking up. Just
look at them. Note that you want to practice seeing what the tires are
doing while looking as far down the track as you can.
When you practice threshold breaking, do it where, if you make a
mistake, you can lock up all four wheels and safely
skid
off into the dirt. On the track, pick a slow corner at the end of a
long straight that has plenty of runoff room. Always make sure that
someone won't rear-end you if (when) something goes wrong. Hit the
brakes hard enough to lock up all four wheels, then let off the brakes
until you stop
skidding
. Then put more force back on the brakes until the tires start to
skid
. Practice until you can reliably keep the car right on the threshold
of going into a
skid
.
By the way, even if you have a safe runoff, try to avoid having to use
it. When you go into the dirt, then come back onto the track, you will
track dirt, which reduces traction, onto the track, messing it up for
other drivers.
If your car has an Anitlock Braking System (
ABS
) and you can turn it off, do so when on the track. Not only can a
good driver often stop a car quicker without it, but the point of a
driving school is to learn, and you won't learn good braking technique
if you let your car do the thinking for you.
If (When) you find that you cannot slow down enough for a turn and
will have to use the runoff, remember that the car will have much less
traction in the dirt. Let up on the brakes just before you go off of
the pavement so you will not lose control as the car hits the dirt.
Straighten your wheel, because if your car is trying to stop and it
suddenly loses traction, unexpected and unpleasant things are likely
to follow. In the worst case your wheel could dig into and catch in
the dirt causing your car to flip. As long as you keep the steering
wheel relatively straight (except to avoid holes and bumps in the
dirt) until you have slowed enough to turn around, you should have no
trouble even if you play Parnelli Jones in the runoff.
Remember not to practice this where people are not expecting you to
suddenly slow down in such a dramatic fashion. Coming to a sudden stop
in the middle of the main straight with a faster car right on your
tail is stupid, but people often do stupid things, especially at
driving schools.
4.2.2
BRAKE COMPOUNDS
Brake linings come in two flavors,
street compounds
that stop well when they are relatively cold but work poorly when they
get too warm, and
race compounds
that work best once they warm up (to a point) but don't work very well
until they warm up. This is because when driving on the street you
will rarely use your brakes hard and often enough to significantly
warm them up. Therefore, for the street you will want brakes that work
well when they are cold. This is why you should not put racing
compound brakes on a street machine.
4.2.3
BRAKE FADE
If you are are using your street car with street compound brakes at a
track school, you may find the stopping ability of the car decreasing
as its brakes heat up. This is known as brake fade. If this happens,
move your
s back a little bit so you do not have to brake as hard to slow down
enough for the turns. Your lap times will increase, but this is a
school, not a race and it isn't worth the risk of losing your brakes
which could end up causing you to damage yourself and/or your car.
4.2.4
BRAKING AND BRAKE LIFE
If faster lap times and maintaining the structural integrity of your
fenders are not reason enough, another reason for smooth application
of the brakes is that they will last longer. When you slam on your
brakes after a long straight, they go from cool to very hot very
quickly. This thermal shock greatly reduces the life of the brake
materials.
Smooth application of the brakes reduces this problem. Even if you
don't mind the expense and bother of replacing brakes, many cars
(especially Mustangs) can destroy a set of brake pads in a single day
of track time. If the brakes aren't treated nicely, you may find it
necessary to replace the brakes before the day is out. If you are
lucky, you will notice the impending brake failure in the paddock,
rather than at end of a 100 mph straight as you are going into a 30
mph turn.
4.2.5
PUMPING THE BRAKES
You may find that the amount of pedal travel required before your
brakes take effect increases to the point that it is difficult to heel
and toe. A temporary remedy is to give the brakes a quick pump or two
before applying them. You do not want to push the pedal down hard
enough that the brakes actually engage, pumping that hard would cause
the front of the car to bounce up and down, making it difficult to
control. Just lightly press the pedal to the point that you start to
feel resistance and quickly release it and reapply it. This pumps a
little extra fluid from the master cylinder into the brake system,
taking up the slack that caused the excessive pedal travel.
Note that this extra pedal travel can be caused by several things,
none of them good. First of all, if your car has drum brakes on one or
both ends, they may have worn down to the point that they are out of
adjustment. Even if your brakes are self adjusting, you may be
wearing them out faster at the track than they can adjust
for. Secondly, there may be fluid boiling in your brake
line
s. Either you are using yourbrakes so hard that the brake fluid itself
is boiling, or there is water, which boils at a much lower
temperature, in your brake fluid. In either case, the pedal will
regain it ’s “hard ” feel when the brakes cool
down. In this situation, there is probably nothing that you will have
time to do at a school and you should take my earlier advice about
brake fade and brake a little bit easier for the rest of the day.
The third possible cause is air in the brake
line
s. If you have air in your lines, the pedalfeel will not return to
normal when the brakes cool down. Unlike the case of the brakes being
out of adjustment, in addidtion to excessive pedal travel, the pedal
will also feel soft. Air in the lines can be a sign of serious
trouble, and if you suspect it, you should not drive the car until the
problem has been solved.
4.3
SHIFTING
4.3.1
PRINCIPLES OF GEAR CHOICE
The two things that affect the choice of gear ratios are the engine
speed and the mechanical advantage of the driveline. The lower the
gear, the greater the mechanical advantage of the driveline. This is
like using a longer lever. Each pound-foot of
torque
applied by the engine will produce more more pounds of force at the
drive wheels, and hence better
acceleration
.
On the face of it, this would imply that if we were to just leave the
car in first gear it would accelerate better and therefore go
faster. There is a catch though. Internal combustion engines only work
within a limited range of speeds. Although most modern small cars can
comfortably drive down the road with the engine turning about 2000
RPM
, they start making good power around 4000
RPM
, their
torque
peaks around 5000, their power peaks around 5500 and they redline
about 6500
RPM
.
Torque
is a measure of force-times-leverage. You get the same 100 lb-ft of
torque
by applying 100 lbs of force to a lever foot long, or 10 pounds of
force to a lever 10 feet long. With the longer lever you get more
torque
for less force, but you have to move the lever a longer distance. The
ratio of the lever pushing to the object pushing back is called the
mechanical advantage.
Horsepower is calculated by multiplying
torque
times
RPM
times a constant that makes the numbers work out. The faster the
engine turns, the further it can push a lever in the same amount of
time, so more work can be gotten from a given amount of force.
This might make us think that by running the engine faster we could
get more power. This is only true to a point, because if you run an
engine too fast, it will break. The speed at which you start risking
breaking your engine is called the
redline.
Most tachometers have three regions, black, yellow and red. If the
tach reads in the black, the engine can turn at that speed all day
long without problems. If the tach is in the yellow, you can run the
engine at that speed for short amounts of time, but not for extended
periods. When you push the tach into the red, you risk doing
expensive damage to your engine.
What this boils down to is that (on the race track) you should keep
the car in the lowest gear possible without overly risking your
engine. On the street you will usually want to keep the car well below
redline. The higher the revs, the more stress you put on your engine,
also the more fuel you will use.
Select an
RPM
for
upshifting
. This will be your shift point. Choose it according to the relative
importance of laptimes and engine life. The more important your
laptimes, the higher the shiftpoint. The more important engine life
is, the lower. The premise is that you don't want to abuse your engine
any more than you have to; breaking engines is both very expensive and
very inconvenient. Besides, if you blow up your engine, you will miss
out on track time. Choose the shiftpoint at or slightly below the
yellow range on your tach. (What I refer to as yellow might be shown
as orange or even a dashed red line as opposed to a solid red at
redline).
As you learn the track, you will probably find a point where your car
hits your shiftpoint to go up a gear just a couple of seconds before
you must start decelerating for a turn, then shift right back down
into the gear where you are now. When this happens, you may find it
expedient to put a little extra stress on the engine for a short time
and save a lot of stress on your clutch and transmission. Ruining your
clutch is only slightly less expensive and incovenient than breaking
your engine, and a lot easier to do.
At what point should you
downshift
? If you are going uphill and the car slows down,
downshift
when it is at the point where it will be below redline in the lower
gear. Unless the gears are evenly spaced, every gear in every car will
have slightly different speed where this happens. A rule of thumb to
start your experimenting would be to use about 2000
RPM
below redline as a
downshift
point.
When braking for a turn,
downshift
while you are braking in a straight line. Use your brakes to slow the
car down, using the engine won't make that much of a difference. If
the shifting is not done smoothly it can break the wheels free, which
can be bad for you, for your car and for your nerves.
Downshift
going into the turn so your car will be in the proper gear when you
start to accelerate out of the turn. Do not shift while you are
turning because not only will it upset the balance of the car, but you
will be too busy concentrating on turning the car to do a good job on
shifting smoothly.
If you are entering a turn where you will need to
downshift
more than one gear, either go through each gear in turn, or skip the
gear(s) in the middle. The advantage of skipping gears is that you
only have to concentrate on one gearshift. leaving your attention for
other things. The advantages of going through all of the gears is that
it is easier to do correctly when you are only doing one gear at a
time. While learning, it is also good practice at shifting while
threshold braking.
If you are in a sequence of turns, it may be better to shift at a
lower
RPM
if it means you can shift in the straights between turns. This is
known as
shortshifting.
If the turn is on a steep downhill, or you have not yet mastered the
technique of heel-and-toe down-shifting (described next), you may be
better off staying in a higher gear for a turn, especially if you
would be
upshifting
after the exit.
4.3.2
MATCHING REVS
There is more to changing gears than putting the clutch in, moving the
shift lever and letting the clutch out. If that is how you shift,
whenever you change gears the car will jerk.
When
downshifting
, you should to match the speed of the engine to the speed of the
wheels at the lower gear. If you are driving a car without a
synchromesh transmission, you will have to double-clutch as described
in section 4.3.2.2 as well.
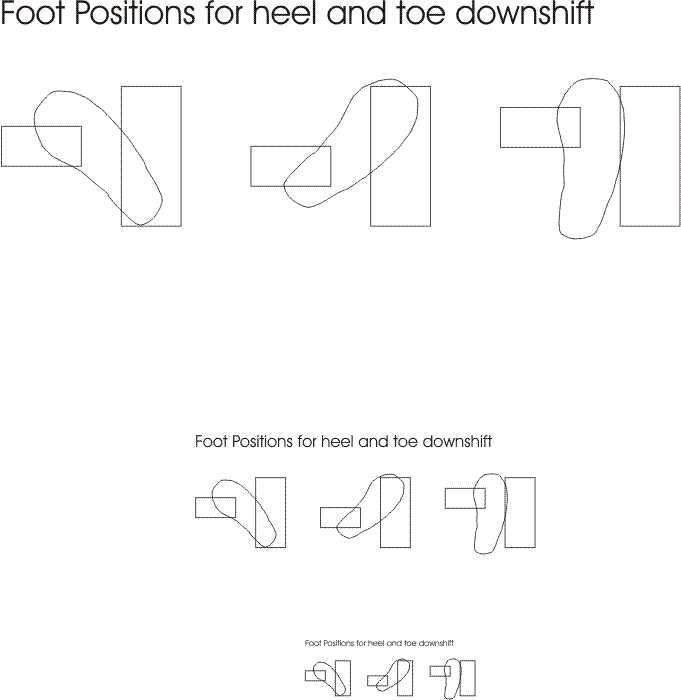
4.3.2.1
HEEL-AND-TOE DOWN-SHIFTING
Matching revs while simultaneously braking and down-shifting is a
technique known as heel-and-toe down-shifting, or just
heel-and-toeing. This is a technique where you simultaneously apply
the gas and the brake by using both ends (or sides) of your right
foot. while
downshifting
The premise behind heel-and-toeing is that when you
downshift
, you do not want the engine to suddenly decelerate the driving
wheels, which puts undue stress on your clutch, driveline, axles
etc. Also, the jerkiness could cause you to lose traction and and
control of the car.
On most cars, the easiest way to perform this technique is to place
the ball of your foot on the brake and either the heel or the side of
your foot on the gas. On many cars, you have to do it the other way
around. On some cars, it is not possible to reach both pedals with the
same foot, although most can be modified to make the heel-and-toe
possible.
Find a position that works for you, then practice just blipping the
throttle. With the car parked, the parking brake on, in neutral, and
with the engine running, put your foot in the heel-and-toe position
and quickly tap the throttle so the
RPM
rises to about 2500
RPM
, then drops back to idle. The
RPM
should not be above idle for more than about a second or two.
While braking, when you slow down enough so you should be in a lower
gear: put the clutch in, put the car into neutral, and blip the
throttle so the revs go slightly higher than the engine will be
turning at that speed in the lower gear Then, as the revs drop to the
desired speed, shift into the lower gear and let out the clutch.
 downshifting" width="681" height="700">
<DIAGRAM: HEELTOE>
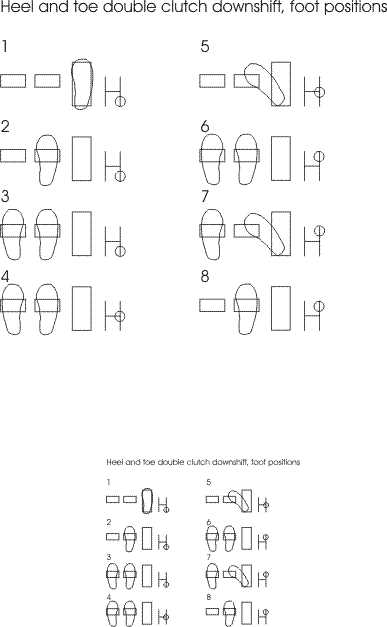
4.3.2.2
HEEL-AND-TOE DOUBLE-CLUTCH DOWN-SHIFTING
If you want to be even nicer to your car, let the clutch out briefly
while shifting through neutral. This will match the speed of
everything in the transmission with itself. Then put the clutch back
in while you shift into the lower gear. This techique is known as
double-clutching.
Eight-steps are illustrated in the diagram. Note that the brake is
being applied through the entire process. If you are
downshifting
because the car slowed down going up a hill and you need the added
torque
of the lower gear, follow the same procedure, but without using the
brake.
1) Accelerating before the turn. Full throttle, car in 4th gear.
2) Braking.
3) Disengage the clutch.
4) Shift to neutral.
5) Re-engage the clutch and blip the throttle to bring the engine
speed to where it will be in the lower gear. (Steps five and six are
only absolutely necessary in cars without synchromesh transmissions)
6) Disengage clutch and shift to the lower gear.
7) Blip the throttle to match revs of engine to the revs represented
by the current road speed in third gear.
8) Re-engage the clutch, and continue braking.
If you are having difficulty with heel-and-toeing when you get to the
track, don't worry about it. There are plenty of other things to
concentrate on. However, it is a very good thing to learn and practice
in daily driving. The ability to heel-and-toe, also eliminates the
question of whether to
downshift
before or after braking.
While it is not absolutely necessary on cars with working synchros in
their transmissions, I highly reccomend always using heel-and-toe and
double- clutching when
downshifting
. As an example of how this can extend the life of the clutch, my
street car has 130,000 miles of mostly mountain road driving and over
20 hours of track time all on the original clutch.
It is equally important to be smooth when
upshifting
. You should be able to shift using three fingers or the heel of your
hand.
<DIAGRAM: dblclch>
4.3.2.3
THROTTLE STEERING
When going through a turn, increasing or decreasing the throttle will
change the handling characteristics of the car by transfering weight
to different wheels. Letting off the gas will transfer weight to the
front tires, and the car will turn more sharply, even without changing
the angle of the steering wheel. Add throttle and it will turn less
sharply. Adjusting your
line
through the turn in this way is knownas
throttle steering
.
4.4
BEING CONSISTENT
If you can't always do it the same; then you can't always do it
right. There are two aspects to getting the car around the track as
fast as possible. Knowing where to put it, and being able to put it
there. Without the first, the second doesn't do you much good. I am
referring to knowing
exactly
where in the turn to apex, not just knowing that you have to get your
inside tires in the same zipcode as the inside of the turn towards the
middle. In other words, if you can't hit the
apex
every time, you won't be able to hit the
apex
right every time.
How, you may ask, does one always do it the same way every time? By
using reference points. Note things about the track that mark where
you want to do certain actions: where to brake, where to turn in,
where to apex or where to put a wheel. Then simply connect the dots,
smoothly.
Pick reference points that will not move. Often times a school will
mark reference points with orange cones, which although easy to see
have a nasty tendancy to get moved by cars hitting them. Find a
permanent feature near the cone to use as your reference point. There
are all sorts of amusing stories about someone using a cone as a
braking marker, then the cone was got knocked a little way down the
track by another car. Another story tells about a driver who noticed
that another used a particular rock as a braking marker, so that night
he moved the rock. And of course there is the story of the driver who
discovered that the rock he had been using as a braking marker was
actually a tortoise when he later saw it move under its own power.
While reference points are an important tool for consistent driving,
you do not want to be looking at them by the time that you reach
them. By the time that you have reached the reference point, you
should already be looking down the track and thinking about the next
several things that you will be doing. Peripheral vision and a sense
of timing are two tools for achieving this.
You can gauge how well you just took a turn by noting your
RPM
(or speed, if you have a speedometer) at the exit. You want to
maximize your speed at the exit of the turn, or sequence of
turns. Another good way of telling how you are taking a section of
track is by where your shift points are. As you start driving a
section of track faster, you will have to
upshift
sooner.
4.5
SCRUBBING OFF SPEED
One of the commonest mistakes is turning the steering wheel more than
needed. Turning your steering wheel slows you down. The more you turn
it, the more it slows you. The longer you keep it turned, the more it
slows you down. It is very important, especially in an underpowered
car, to take a single smooth
line
through the turn that allows you to turn the steering wheel as little
as possible.
As soon as you have completed your turndown in a turn, you should
unwind the steering wheel as much as you can and still clip the
apex
, and exit at the edge of the track without falling off.
On many turns, when a car is
understeering
, turning the wheel beyond a certain amount doesn't do anything but
slow you down and wear rubber off of the front tires. If you find
yourself pushing, try letting out the steering a little bit and gently
ease off of the throttle. How do you tell if the car is "pushing"?
First of all, turning the wheel more does not cause the car to turn
more. More importantly, as a car starts to
understeer
, the effort required to turn the wheel will suddenly drop. When you
feel the steering go "light" is the time to back off of the steering
just a little bit.
4.6
WHAT TO DO WHEN THINGS GO WRONG
Be smooth, drive through it, don't do anything abruptly.
The most common kinds of trouble that a student will find are: getting
off of
line
, runningout of road, finding something in the road, and loss of
traction. When things start to go wrong, don't make any sudden moves.
Especially, don't suddenly take your foot off the gas, especially in
the rain. Decelerating will transfer weight to the front wheels from
the rear, often causing you to spin. I have caused some of my most
spectacular spins by taking my foot off the gas at the wrong time.
Be very careful when you see someone off of the track and/or pulling
back onto it. He probably just scared himself silly and may not be
thinking too clearly.
If someone has a wreck, don ’t stop and help. If by chance it is
a corner (or an unsupported practice session) where there are no
corner workers you will do more good by driving back to the pits so
they can send out the emergency crew.
4.6.1
GETTING BACK ON LINE
Everyone occasionally finds themselves off the
line
. You may be passing someone, you maybe being passed, you may be
avoiding an incident, or you may simply have screwed up. The important
thing is to get back onto the
line
.
The most common situation is to
apex
the first of two turns too early, screwing up your approach for the
second. Chances are, you will be entering the turn too 'low' with no
chance of getting across the track for the normal entrance into the
turn. No problem. Brake a little early so you slow down enough to
take the turn on the 'inside'
line
, until you reach the
apex
. At this point you are back "on the line" and can continue as you
normallly would have.
If, on the other hand, you tried to get back on the
line
at the entrance, chances are you wouldhave just been set up wrong for
the turn, blown the
apex
and therefore the exit as well as the
line
through any turns following. Make the best ofa bad
line
.
4.6.2
RUNNING OUT OF ROAD
When you put two wheels into the dirt, keep your foot on the gas,
(letting off will just make you spin) and
gently
drive back onto the course. Another option, is to straighten the
steering wheel FIRST, before going off of the track. Then, when the
car is straight gently let your foot off the gas. Once you have
regained control of the car, you can either come to a stop, or gently
pull back onto the track.
Be very careful when pulling back onto the track. Remember, the guy
coming up on you might be so intent on what he is trying to do, he
might not notice you pulling out into his way. Or he may notice you,
but be too close to the limits of his car to do anything about it. A
yellow flag being displayed doesn't guarantee that the other drivers
saw it. Be aware that students are often concentrating so intently on
one thing, they can fail to notice other, far more important, things.
Look to the flaggers for reentry. If they say it's clear, double check
(if you can see) and go. If they tell you to wait, then wait until you
get the clear sign.
After you have had an off road excursion, remember that you now have
all sorts of dirt and gravel on your tires. Dirty tires do not stick
as well as clean tires. Even dirt that got on the track because
someone else spun reduces traction. Watch out for it. It is often a
good idea to pull into the pits the next time around to make sure
there are no rocks or gravel caught between the wheel and the tire.
Take your time getting back up to speed. One of the times you are most
susceptible to making a mistake is when you're already rattled from
making a previous mistake. Shake out your arms, relax, check the
gauges and drive 7/10s until your heart rate gets below 300.
It is important to remember that it is usually better to smoothly
drive off of the track and back on than to pinch off your exit trying
to stay on the track. Of course, if there is a large rut, a serious
drop-off at the edge of the track, or something to hit, then do what
you can to avoid hitting it.
4.6.3
FINDING SOMETHING IN THE ROAD
It is much easier to avoid trouble by steering around it than trying
to stop in time to avoid it. If you must slow down, signal the other
drivers by putting your hand in the air. Watch your mirrors. Make sure
that you don't get punted because you tried to avoid someone elses
mistakes.
It is just as important to watch your mirrors when making an emergency
stop on the street, perhaps more so. People driving on the street are
very prone to not paying attention to what is going on around thm.
<DIAGRAM:getting back on line>
4.6.4
LOSS OF TRACTION
Understeer
When your front wheels lose traction first, it is known as
understeer
, plowing, or pushing. The steering wheel becomes very easy to turn,
but turning it more has no added effect. The car steers less than you
want it to.
Let the steering out until turning the steering wheel takes effort
again. All that turning the wheel beyond this just slows the car and
wastes tires. Gently let off the gas to put weight, and traction, back
on the front wheels. Be very gentle and smooth, lest you over-correct
for the
understeer
and find youself in an
oversteer
situation.
Oversteer
When the rear tires loose traction first, it is known as
oversteer
, tail-happy, or loose. Point your tires in the direction that you
want to go. If you over-correct, the tail end will whip past center
and the car will try to spin out in the other direction. When you are
experiencing
oversteer
, don't suddenly take your foot off of the gas. All that will do is
transfer the weight to the front tires causing the car to spin out.
<DIAGRAM under/
oversteer
>
4.6.5
SPINNING OUT
Eventually you will find yourself in a situation where you know that
you are going to spin out. The car is
oversteering
and opposite lock is not going to help.
To regain control of the car when you spin, simply straighten the
steering wheel and depress the clutch.
Remember that tires would much rather roll forward (or backward) than
slide sideways. So, if the brakes aren't locked when the car has spun
180 degrees (you are facing backwards) it is a lot easier for the car
to roll straight backwards than to continue spinning. It is important
to depress the clutch to keep the car from stalling. When the car is
rolling backwards, you can simply drive backwards to a safe place to
turn it around.
If you want to try being fancy and bring the car back around so that
you are heading forwards again, turn the wheel to the side of the road
on which you want to end up. If the wall is to your right (while
looking out the windshield) turn the wheel to driver's left.
A simpler technique is referred to as "in a spin, both feet in". Put
your left foot on the clutch and your right foot on the brake. Your
car will come to complete stop, with the engine still running, so you
get going again as soon as traffic allows.
A rule of thumb is: If you hit the brakes, you will usually spin to
the outside. If you stay on the gas, you will usually spin to the
inside.
If a car is spinning in front of you, aim at where he is when he st,
because he probably won't be there when you get there. Cars usually
spin to the inside of the track. Be careful though, sometimes they hit
something and bounce back out. Be very carefull about lifting your
foot off the throttle lest you cause yourself to spin out.
Many spins are caused when a driver sees someone getting into trouble
in front of him , and lifts off the throttle to slow down. If the car
is on or near it's handling limits, when the weight comes off of the
rear tires, the available traction becomes less than the traction
being used and then
two
cars are spinning.
.4.6.6
IF YOU HAVE MECHANICAL PROBLEMS
When the car is acts up and slows down, put your hand in the air to
warn the other drivers.
Don't stop in the
line
orin an impact area. If there are a lot of
skid
marks pointing to where your car is parked, it is not a healthy place
to hang out.
Try not to get stuck in mud or sand. If you pull off of the course, do
it where you will be able to get back on safely.
Do not park in tall, dead grass. Hot exhaust pipes and catalytic
converters are excellent fire starters.
Before taking your car to the track, make sure it has tow points so
that the tow crew can pull it without damage. Be pleasant to the tow
crew; it isn't their fault that your car broke, or you crashed.
4.6.6.1 IF YOUR CAR GOES DEAD ON THE COURSE
If your car is dead on the track, or in an impact area, unless it is
on fire, stay put and keep your helmet and belts on until you receive
instructions from the corner worker. The car is much better protection
from other cars than is a driver's suit.
Do not work on or inspect your car unless it is well protected. It is
much better to lose track time, than be run over because someone lost
control of their car while you were working on yours.
When you get out of the car, get out on the side away from
traffic. Get well back from the edge of the track. Do not let the
barriers give you a false sense of security. Cars, and at the very
least, parts of the cars can easily go flying over the barriers in a
high speed impact. To quote a flagging trainer: "There is no place on
the track a car cannot go, only challenges not yet met".
4.7
THE DIFFERENCE BETWEEN FRONT AND REAR-WHEEL DRIVE
There is less difference between driving the two than many people
think. Front-wheel drive cars tend to
understeer
more than rear-wheel drive, but some rear-wheel drive cars plow worse
than some front-wheel drive cars. You won ’t need to worry about
the subtle details. Most drivers who are new to the track, take
several track days to just become able to get their cars consistently
within walking distance of the
apex
. The minor difference in the ideal
apex
for each type of car is not important at that point.
4.7.1
POWER UNDERSTEER
One of the differences between a front-wheel drive and a rear-wheel
drive car is power
oversteer
vs. power
understeer
. In a front-wheel drive car , if you apply too much power in a turn,
you will experience power
understeer
. Your steering will become very light and will have little
effect. This is a bad thing.
If this happens, keep the front wheels pointed in the direction you
want to go. When the front tires regain traction, the car will
suddenly accelerate in whatever direction they are pointing. If the
wheels are pointing at the side of the road, or another car, bad
things could happen.
The appropriate response to power
understeer
is to gently let off of the throttle while letting out some of the
steering until traction is regained. When you exceed the front tires'
abilities, turning the wheel more will only slow the car down and
waste expensive rubber.
4.8
DRIVING WITH AN OPEN OR A LOCKED DIFFERENTIAL
There are three types of differentials, open, limited slip, and
locked. An open differential allows the wheels to turn at different
speeds when going around a turn. Unfortuaatly, if a wheel loses
traction, as when the inside wheel comes off of the ground, no power
will be applied to the wheel that still has traction. A locked
differential acts like no differential at all. Both wheels will turn
at the same speed, as if they were on a solid axle. This makes it
harder for the car to go around turns, because one of the wheels will
be scrubbing against the pavement. A limited slip will allow the two
wheels to turn at different speeds, within limits. This allows the car
to easily go around turns, and still get power to the road when one of
the wheels does not have any traction. The problem with limited slip
differentials is that they are expensive.
Carroll Smith has an excellent discussion of differentials at the back
of "Drive to Win".
4.8.1
OPEN DIFFERENTIAL AND SOFT SUSPENSION
Most street cars have open differentials and relatively soft
suspensions. What this means, is that if you are cornering hard and
the inside wheel comes off the pavement, the wheel will spin freely if
you apply the throttle. If you find yourself unable to get any power
to the ground when you are exiting a turn, try taking a later
apex
line
. By slowing down and turningdown more at the beginning of the turn,
the car will be cornering less hard at the exit, which will help keep
the inside wheel on the ground.
4
.8.2
LOCKED DIFFERENTIAL
��������������
Since an open differential can be converted to a locked differential
with about $0.50 worth of welding rod, it is a common performance
modification. Although this will solve the traction problem of an open
differential, it causes some problems of its own.
The first problem is that cars with locked differentials want to go
straight. This makes it tough to get the car to turn down. It may be
necessary to trail brake (see section 4.10) more than if the same car
had an open differential. On the plus side, since both driving wheels
want to turn at the same speed, the car will be very stable under
acceleration
, making it very easy to "plant" the rear end in rear-wheel-drive car
by accelerating out of a turn.
The other downside of a locked differential is that since power can
get to the outside wheel in a turn, it is easier to break the outside
wheel free in the rain, which can cause a spin in a rear-wheel drive
car.
4.9
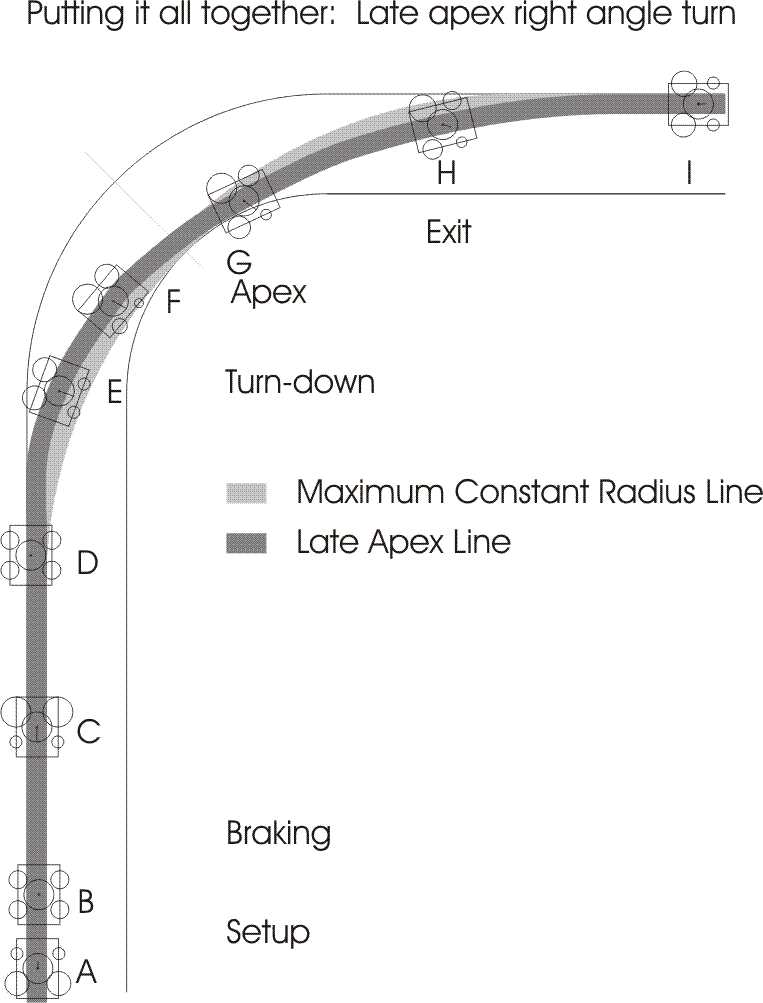
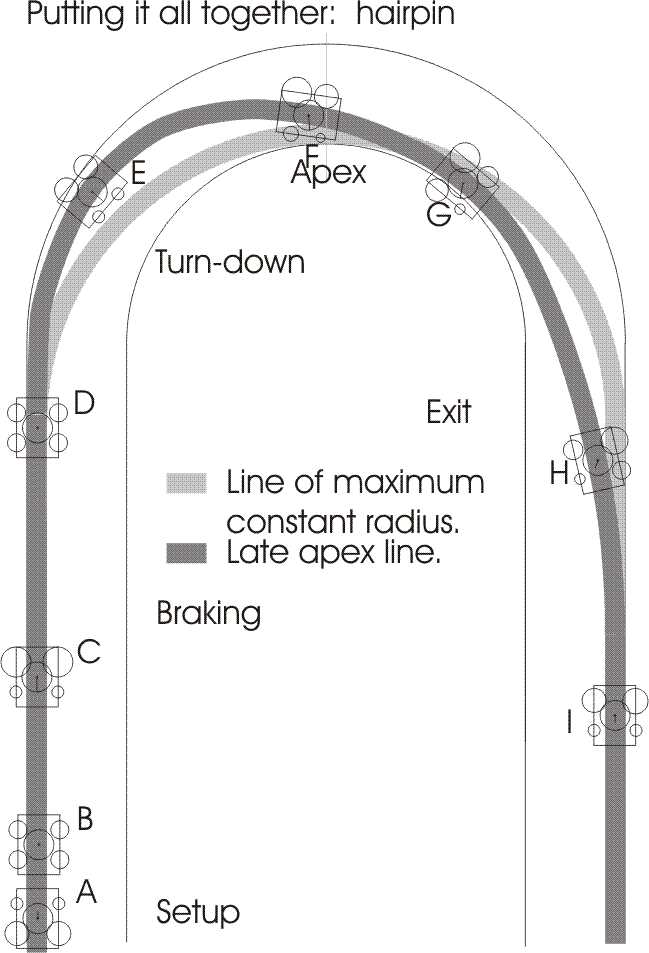
PUTTING IT ALL TOGETHER
The next few pages cover how to drive the late
apex
line
through a turn. (It does not cover the details about why. They are
covered in section 3.1.)
Study both the small and the large drawings in this section.
The small drawings in the margins show the weight-balance and the
acceleration
vector drawings for their associated paragraphs. They show what is
happening to the car at each of nine phases of the turn.
The two full-page drawings show the
line
through a right angle turn and a hairpin turn, illustratingwhat is
happening to the car during each phase. The position of the car at
each phase is indicated by a miniature of their balance-vector
drawings.
The circle in the center of each drawing of a car represents the
circle of friction
, or the
acceleration
potential, of the tires. For simplicity, we will assume that the tires
can generate the same amount of force in any direction. The arrow
within this circle represents the
acceleration
vector of the car. If the car is speeding up, the arrow points
forward. If the car is braking, it points to the rear and if the car
is turning the arrow points to the side. Note that at no time can the
arrow extend outside of the circle.
The car used in the example can only accelerate at half the ability of
the tires, which is a reasonable model of most street cars. While some
cars can spin their driving wheels when driving in a straight
line
just byputting on the throttle, most cannot.
The amount of downforce on each tire is shown by the size of the
circle that represents that tire. The more downforce on the tire, the
larger the circle. Note that the weight transfers away from the
acceleration
vector. A car that is speeding up will have more weight on its rear
tires. Keep in mind that the greater the force pushing down on a tire,
the greater the sideways force it can generate.
Although passing in the turns is not allowed in the beginner's section
of most schools, you should watch out for it anyways. People break the
rules. You should be aware of where the other car is, lest you hit
someone who is passing you. Eventually, you will be driving in
sessions where passing in the turns is allowed. It is better to
develop good habits early than to try to break bad ones later.
While I break the turn up into discrete steps, in reality they all
blend one into the next. Concentrate on smoothly connecting each
phase of the turn so that they blend into on smooth and flowing
manuever.
4.9.1
SETTING UP FOR THE TURN
A) Before the turn,
line
the car up all the way at the outside edge of thetrack. Check your
mirrors, don't pull into someone who is trying to pass you on the
outside. If someone is immediately behind or in front of you (in a
school) brake a little early to give yourself room in case their car
cannot stop as quickly as you.
While you are preparing to brake you should note where your
braking point
is going to be. You should not look at it again until the next lap.
B) When you take your foot off the gas, weight will transfer to the
front wheels. Do this smoothly so that the car does not bounce up and
down. Let the car settle for just an instant before applying the
brakes.
4.9.2
BRAKING
C) By the time you reach your
braking point
, you should be looking through the entrance portion of the turn to
the
apex
. One of the skills that you need to develop is an awareness of where
you are so you can do things at the same place every lap, without
looking at your reference points. At your braking reference point,
apply the brakes. Quickly, but gently, squeeze them on until wheels
are on the verge of lockup.
(In section 4.3.2.2 is a discussion of heel-and-toe
double-clutching. For most manual transmission cars it is the
smoothest way to slow down for a turn. If you can learn and practice
it before going to the track, do so. If you do not know heel-and-toe
braking when you get to the track, do not try to learn it along with
everything else.)
If you don ’t heel and toe, you will need to brake earlier, to
give yourself time to
downshift
between braking and turning down. When you
downshift
, do so quickly to minimize the time when you are neither braking,
accelerating nr turning. Even if you don't heel-and- toe, you should
match the revs on a
downshift
by blipping the throttle while you shift through neutral.
D) When you take your foot off of the brake, weight transfers from the
front to the rear wheels. Do this smoothly so that the car does not
bounce up and down. While you do not want to coast for a long time
going into the turn, wait an instant between letting off of the brakes
and turning the wheel to let the car settle.
4.9.3
TURN-DOWN
E) Before you turn down, make sure that there is not a car where you
want to go. By this point you should be looking past the
apex
to the exit. So the trick is to know where the cars around you are,
while looking further down the road. Do this with your peripheral
vision and a quick check of your mirrors.
The place you start turning the steering wheel is called your turndown
point. Since turning the wheel will scrub off speed, spend as little
time with the wheel turned as possible. Wait as long as you can to
turn your car and still make it to the
apex
. It also means you should dial in your steering as quickly as you
can smoothly do so, so you waste as little time as possible in
transition.
4.9.4
APEX
F) By the time the car is a little past one-third of the way through
the turn, it (technically the inside wheels) should be aimed at the
apex
. The correct
apex
for a turn will usually be between one-half and two-thirds through the
turn.
When the car is aimed at the
apex
, let out the steering as you apply the throttle. A low powered car on
a dry track will often be able to use full throttle by the
apex
. Be carefull though, too much power could cause the driving wheels to
lose traction, possibly causing the car to spin out.
There are two things to keep in mind about an
apex
. The first is where you
apex
the turn, i.e. where the car is when it reaches the point where it is
closest to the inside of the turn. The second is the direction the car
is facing when it reaches the
apex
.
How deep into the
apex
should you go? As deep as you can without upsetting the suspension of
your car. The closer to the inside of the turn you are, the more track
you have to the outside, and the faster you can take the exit. Leaving
any space between you and the edge of the track at the
apex
is effectively just throwing away that much track on the
exit. However, putting all four wheels into the dirt on the inside of
the turn will probably just do nasty things to the tires, the
suspension, and possibly the bodywork.
Most racetracks have concrete
berm
at the insides of the turns. This concrete protects the edge of the
track to keep the asphalt from crumbling as cars drive right on the
edge of the road. The softer a cars suspension is, the more it will
lean and the less weight will be on the inside wheels. In the some
cars one of the inside wheels will be off of the ground. Therefore the
softer a cars suspension, the higher on a
acceleration
you can drive.
If you hit the
acceleration
in a car with a very stiff suspension, you will upset the suspension,
launch the inside wheels into the air, and end up going slower through
the turn.
Either way, when you hit the
acceleration
just right, you will feel a slight bump. Not enough to upset the car's
suspension, just barely enough to notice.
On your warm-up and cool-down laps, when you are not driving all out,
it is a good idea to solidly drive up on the
berm
. This helps you learn exactly how wide your car is, and exactly
where the
berms
are.
A NOTE ABOUT THE PAINT ON THE BERMS
These
berms
, and about eight inches of track next to them, are usually painted
red and white. This paint does not give as good traction as does bare
asphalt. In the dry, there is so little weight on the inside wheels
that this does not cause a problem. Therefore, in the dry, you should
put your inside wheels well onto this paint.
However, in the wet, his paint becomes one of the best
friction-reducers known to mankind. Careless application of throttle
with your drive wheels on the paint will cause an immediate loss of
traction. With many rear-wheel drive cars this will almost guarantee a
spin. In the wet, put your wheels right next to, but not on the paint.
You should be aware if anyone is trying to pass you on the
outside. When this happens, keep the car close to the inside edge
longer, making it a very late
apex
in order to exit the turn without hitting the other car.
4.9.5
EXIT ��
G) Will blend into H.
H) Once past the
apex
, you should be increasing throttle and unwinding the
steering. Remember, turning the steering wheel is like putting on the
brakes. The more the wheel is turned the slower you will go. At this
point in the turn you are entering the straight and should be treating
it as such.
I) Your speed should carry you all the way to the outer edge of the
track at the exit. You should finish unwinding the steering wheel when
your car reaches the outer edge and your wheels (and car) should be
pointed down the straight.
Except for the situation where you are sacrificing the ideal
line
in one turn to set up forthe next, you should always exit all the way
to the edge of the track,
even if your speed does not carry you all the way out
. There are two reasons for this.
The first reason is that as your technique improves, your increased
speed will be carrying you to the edge of the track. It is best to
learn your
line
s putting the car where it will eventually be.
The second reason to use the whole track is the tighter your steering
wheel is turned, the more speed you will scrub off. Therefore the less
you turn your wheel and the sooner you straighten it, the faster you
will go. Get into the habit of using as little steering as possible.
Look at the difference between the
line
of maximum constant radius and the late
apex
line
. Note how turningsharper earlier in the turn lets you accelerate
during the turn rather than waiting until the car is on the straight.
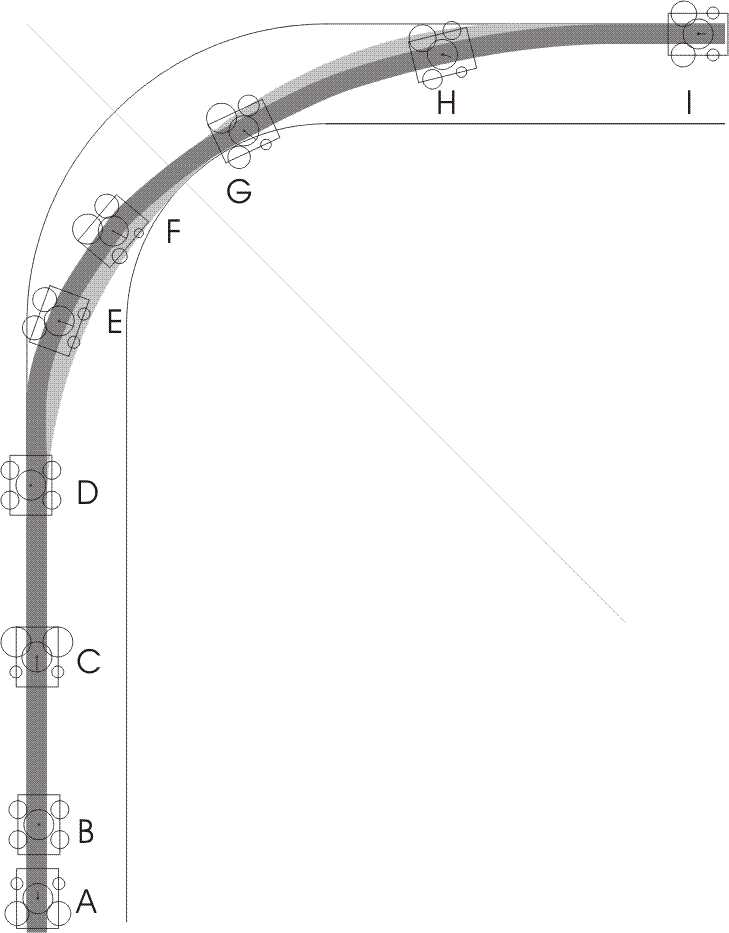
DIAGRAM: RTWCAR >
<DIAGRAM hairpin>
4.10
TRAIL BRAKING
If you have a car that
understeer
s, use trailbraking to improve its ability to turn down. By trailing
your braking deeper into the turn you keep weight on the front tires
during turndown, making the car turn in better.
Trail braking also has the advantage of allowing you to wait a little
longer before you have to start braking.
Just before the turn-down marker, start releasing the brakes. As you
turn the steering wheel, release the brakes more and more. The
steering wheel should be turned the most just about as the brakes are
all the way off.
Trail braking is an advanced technique. Wait until you have had a day
or two of track time before you try it. Even if trail braking would
help your car's handling, all not trail braking will mean is that you
will need to slow down a little bit more under straight line braking
to make the turn.
There is another technique known as the "confidence lift". When a car
has the handling to take a turn at full throttle, but has difficulty
turning in at full throttle, you can briefly lift your foot off the
gas as you turn in.
However, people will often lift at the entrance of the turn, not
because the car has trouble turning down, but because they have
trouble convincing their foot to stay down. When this happens, try
this trick. Lift your forefinger from the steering wheel. This often
fools the brain by making it feel you are lifting your foot, while you
stay at full throttle.
WARNING
Trail braking and trailing throttle, either in a car that tends
to
oversteer
or in the rain will likely cause the car to spin.
<DIAGRAM: trail braking >
����������
SECTION 5
ABOUT THE THE DRIVER
5.1
PHYSICAL
Performance driving
is anathletic activity. As with any sport, it requires strength,
stamina and concentration. When people first get into performance
driving they are often surprised at how much effort it takes just to
steer the car. The better the tires and the sharper the turns, the
more strength is required. So, if you have the time to start working
on your upper body strength for a while before you go out on a track,
do so.
You don't have to join a health spa; just get in the habit of doing a
few pushups and pullups each day. Do not start working out one or two
nights before going out on course. All this will do is make you sore.
Stamina is also very important. Even without regular exercise there
are things you can do to improve your stamina at the racetrack. Try to
sleep well the night before you go out. Chances are you will be all
keyed up and will have a hard time getting to sleep. If you live
several hours from the track, find a place to stay near the track so
you can sleep in till 6 or 7 a.m., rather than having to get up at
4:30 after laying in bed wide-awake till 2 a.m.
If you can swing it, having a motorhome at the track is very nice. Not
only does it give you a zero minute drive to the track in the morning,
but it gives you a comfortable place out of the wind, sun and rain
during the day.
5.1.1
CONSERVING YOUR STRENGTH
Granted, driving a car with skinny street tires and power steering
takes a lot less strength than driving a car with manual steering and
fat racing slicks, but after a while you will get tired from driving
at speed. The less energy you waste, the more you will have at the
end of the day, or race.
Make sure your seatbelt is tight. Not only will it work better if you
need it, it will hold you in your seat. This leaves your arms free for
steering the car, rather than trying to hang on. Use long straights as
a chance to check your belts and gauges and to relax. Use the "dead
pedal". Many cars have a place to brace your left foot, to help hold
you in the drivers seat.
Try to stay relaxed. Tenseness tires you out.
Go to the bathroom before the track session. Even if you don't think
you need to. Few things are more distracting on the race course than a
full bladder. At what track time costs, why risk wasting a session,
when one minute in the outhouse could have prevented the whole
problem?
Eat and drink well at the track. See section 6.4 on
what to bring
.
As obvious as it seems, it still bears mentioning to abstain from any
alchohol until the day is out. Most clubs actively prohibit open
alcoholic containers until after the final checkered flag. It is also
a good idea not to drink the night before you drive. It is impossible
to be your best when you are hungover.
Check with your doctor about any drugs you take, whether prescription
or not, for medical conditions. Anything that will hinder your
concentration or abilities turns you into a hazard on the
track. Recreational drugs are out; don't do them at the track.
5.1.2
ERGONOMICS
The name of the game is car control. You cannot control the car to the
best of your abilities if you are not comfortable. You should be able
to reach all the controls comfortably and you should not be cramped.
5.1.3
HOW TO SIT
Sit so you can reach all of the controls easily when strapped in. Do
not sit so far forward that you are cramped and cannot move freely. I
like to sit so that at full pedal extension my legs are not quite
fully extended.
You should be able to touch the top of the steering wheel with both
wrists while your back rests firmly against the seat. This gives you
enough arm strength to work with. On cars whose wheel is more
horizontal, it may work better to use the bottom half of the steering
wheel.
If you steering still requires enough strength that it tires you out,
try moving the seat closer so you get better leverage with your arms.
Never lock or overextend a joint. Knees and elbow joints should always
be at least slightly bent, even when the steering wheel is turned all
of the way or the pedals are fully extended.
5.1.4
HOW TO HOLD THE WHEEL
Hold the steering wheel with your hands directly across from each
other with the horizontal line connecting them going through the
center of the steering wheel. If the wheel were the face of a clock
you would be holding it at the positions marked with a three and a
nine. Hold the wheel lightly but firmly. Too tight a grip will tire
out your forearms and make you sore.
5.1.5
HOW TO STEER
If the turn requires turning the steering wheel less than 120-180
degrees, don't take either hand off the wheel.
If the turn requires more steering than you can comfortably do without
taking your hands off the wheel, then, as you turn down, reach over
with the hand on the inside of the curve (on a left-hand turn this
would be your left hand) and grab the wheel just above the other (the
right) hand. Do not cross your arms, turn the wheel with that one
hand, letting the wheel slip through the other, until it is back in
its original position. You are now holding the wheel at nine and
three, with the wheel upside down. Continue turning as if it were a
regular turn. As you unwind the wheel, when you get back to the
inverted nine and three position, reach across with the outside hand
and bring the wheel back to straight.
On the very rare instances (usually while something is in the process
of going horribly wrong) where you have to turn the wheel more than
360 degrees, this can be repeated. Keeping your hands at nine and
three also helps you remember which way to point your wheel so the car
will eventually go straight.
Always keep your hands at either "nine and three" or "three and
nine". Never let the steering wheel slide through both hands at
once. If something happens, the steering wheel can be yanked
completely from your grasp.
In the drawing, the steering wheel is shown from the drivers point of
view. The left hand is represented by the white circle, the right hand
by the black. The bottom of the steering wheel (when the wheels are
straight) is represented by the solid black spoke.
Hold the steering wheel with your hands in the 3 o'clock and the 9
'clock positions (also called "3 and 9"). You should be able to turn
the steering wheel 180-degrees in either direction without letting go
of it.
On some turns it may be necessary to turn the steering wheel more than
180- degrees. This example shows turning the wheel 360-degrees to the
right.
A) Shift your left hand down slightly, then move your right hand to
the "nine o'clock" position.
B) While turning the wheel with your right hand, let the rim slide
through your left hand.
C) When you have turned the wheel 180-degrees, again grip the wheel
with your left hand and continue turning for another 180 degrees.
Unwinding the wheel at the exit of the turn is the opposite of the
above with your left hand moving over and the wheel slipping through
your right hand.
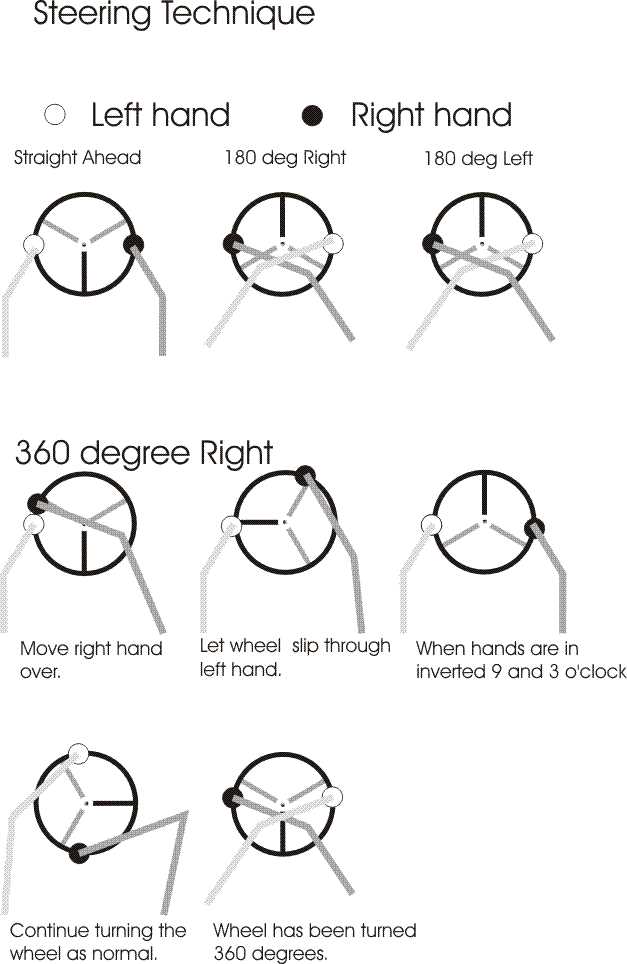
Diagram...Steering technique
An alternative to the above technique is to only move your hands 90
degrees at a time rather than 180. You will still only turn the wheel
in specific increments, but you may find your arms don ’t get as
tangled up as with moving your hand positions 180 degrees at a time.
5.1.6
EQUIPMENT
5.1.6.1
SEAT BELTS
If you get into a wreck, seat belts will save your body from all sorts
of unpleasant damage. However a good set of seatbelts does more than
just this. A five or six point harness, properly tightened down will
hold you in place while going around turns. This means you don't have
to use up all of your strength holding yourself in place.
Autocrosser trick of "prelocking" inertial belts....
5.1.6.2
SEAT
Along with seatbelts, a good seat will do wonders for holding you in
place. It will also give added protection in the event of a crash.
It is vital taht the seat be securely mounted. In a crash, if the seat
tears free, then there will be nothing holding the driver in place. If
an accident causes 12.5 g's of deceleration, a 160-pound driver will
put 2000 pounds of force on his seat.
5.1.6.3
HELMET
Helmets are extremely important safety gear. When you buy a helmet
there are several important things to consider: type, rating, weight,
fit, features and cost.
I prefer a closed face helmet. If things go seriously wrong, a closed
face helmet will protect your face as well as your head. If a fire
were to happen in the car, closing the visor would go a long way
toward protecting your face from the flames while you escape the
car. If you will be driving an open top car you will be required to
wear a closed face helmet.
If I am going to be driving late in the afternoon, I will take a strip
of racer's tape and put it across the top of the visor, just above my
line of vision. When I am driving into the sun, I can tilt my head
down to shade my eyes with the strip of tape. You can also purchase
shaded visors to put on the helmet.
Several organizations test and rate helmets. The best known is the S
nell Foundation,
which has two rating schemes: M for Motorcycle and SA for Special
Application (i.e., auto racing). Approximately every five years they
update their minimum ratings. The SCCA currently requires a ehlmet to
have either an SA 85 or the stricter SA 90 rating. The difference
between the SA and the M ratings is that SA helmets have a fireproof
liner and the number and severity of impacts they will protect against
is different. Also, while it is legal to wear an SA rated helmet on a
motorcycle, many sanctioning bodies may not let you wear an M rated
helmet driving a car on the track.
All things being equal, you will want as light a helmet as you can
afford. Holding a heavy helmet up as you go around high-g turns can
tire your neck muscles and make you sore and uncomfortable.
The fit of a helmet is critical. A helmet that is too loose will not
properly protect your head. A helmet that is too tight will give you
headaches and make it difficult to concentrate. Each brand and model
helmet will fit a little bit differently. It is important to try on
the helmet you intend to buy. Buy one that is a little snugger than
ideal because it will loosen up and conform itself to your head. If
you are going to be wearing a fireproof hoodsock with your helmet (a
good idea), bring it along when you try on helmets.
Helmets come with wide variety of features, such as various vents to
keep you cool or to keep the visor from fogging up. The only way to
find out if they work well is to ask around. You can save yourself a
lot of money by finding out helmet X which costs $200 fogs up horribly
in the rain, while helmet Y which costs $300 works just fine in the
rain.
Helmets vary greatly in cost. An old adage says that if you have a $20
brain then buy a $20 helmet. However just because a helmet costs more
does not mean it will protect you better. As long as the helmet has
the requisite safety rating, you can assume it will do a reasonable
job of protecting you.
If you are going to a drivers school as a one-time or an occasional
thing, you might be able to borrow a suitable helmet from a friend.
5.1.6.4
FOG SHIELD
I recently discovered a wonderfull device known as a Fog City Fog
Shield. It costs about $20 and is available at motorcycle shops. It is
a clear piece of plastic, with a thin strip of adhesive around the
edge, and it glues to the inside of your helmet visor. It is nearly
impossible to fog one of these up. The down side is that in some cases
it will increase glare from oncoming lightsbut this is seldom a factor
on the track.
When installing it, make sure that the inside of the visor is
absolutely clean. Some come with a token anti-fog coating. It is very
difficult to line up one clear piece of plastic on another, so before
applying it, take a white board (dry erase) marker and mark where you
want it to go on the outside of your visor. When it is installed,
simply wipe the marks off of the visor.
5.1.6.5
NECK SUPPORT
It is a good idea to get a neck brace, often called a horse
collar. This fits around your neck between the helmet and the
shoulders. It does not hinder turning your head, but does limit
tilting the neck. It greatly reduces the chance of neck injury in the
event of an accident.
Another system, called a HANS (Head And Neck Support), is more
effective than a horse collar. The downside is it costs several
hundred dollars.
5.2
MENTAL
5.2.1
DRIVING FAST vs. RACING
The major difference between a race and a driving school is you CANNOT
win a driving school. But you sure as hell can lose.
Things tend to go wrong at race tracks. When driving at the car
’s limits, you are pushing the car and all of its components to
their absolute limits. If anything is marginal, it will break. Even if
nothing breaks, drivers make mistakes. If not you, then maybe someone
else.
Watch out for what racers call the "
red mist
", where you get so wrapped up in passing the other guy you forget to
be afraid. The problem is, you also tend to forget about such things
as the laws of physics, the limits of the car etc. Your attitude
changes from "If I brake any later than this, I will crash" to "If I
don't brake for this turn, I can pass the other car". What often
happens is you pass the other car, just before you crash.
Even though taking a performance driving school will improve your
driving and make you a safer street driver, DO NOT TAKE YOUR CAR ON
THE TRACK IF TOTALING IT WOULD RUIN YOUR LIFE. Wait to take the class
until, if the worst case happened, you could afford the loss.
5.2.2
ATTITUDE
If you are primarily interested in driving as fast as you can but
don't want or feel the need to learn anything, then there isn't much
you will learn at a school.
You think of yourself as a very good driver. When most people take a
track school for the first time they are already one of the best (and
fastest) drivers they know. Yet few people who have not driven a car
on the track really understand what a car's limits are and how to
drive it at them.
Learn to take criticism. Don't argue with the instructor or make
excuses: it just wastes time. He isn't telling you that you are doing
something wrong just to make you feel bad.
Let the instructor teach his own class. If he wants your advice, he
will ask for it. No one seems a bigger fool than the student who tries
to lecture the instructor.
If you have problems with your instructor, go to the head instructor
and get another. It is nothing to be ashamed of, some people just do
not work well together.
Do not take advice from people other than your instructor. Learn from
one person at a time.
Be especially wary of people who tell you the great lie of racing, "I
take that turn flat out." They either drive a Schwinn or are
lying. Either way, their advice does you no good.
Don't bother arguing with track officials.
If you don't know something, ask. If you aren't comfortable with
something, ask. There are no stupid questions, just stupid mistakes.
Be predictable. Many incidents are caused by a driver doing something
unexpected while he is being passed. Keep on the racing
line
. If passing is allowed on the turns, keep on the
line
so the overtaking driver will knowwhere to expect you to be. If
passing is only allowed on the straights, point faster cars by on the
straights. If the car behind you is much faster in the turns, but
doesn't accelerate as well, back off the throttle and let him pass.
Don't take a driving school to prove to the world that you are the
best driver that ever lived. Take one to become a better driver, no
matter how good you are. You won't become a better driver by making
bonzai passes or blocking the other guy. You definitely won't become a
better driver by driving beyond your abilities and rolling your car up
into a little ball.
You should be driving the car, it shouldn't be driving you. If you are
spending all of your energy trying to keep it under control, you don't
have any left to spend on doing things correctly. Slow down to go
faster.
A friend read a draft of this just before taking a drivers school,
afterwards, he sent me a note with these comment
Driver attitude...Well I think this is essential. I decided several
things before I showed up at the track...
1 I am there to learn.
2 Therefore I will attend and listen in the classroom.
3 I will ask questions when I do not understand.
4 I will ask for repetition if I still do not comprehend.
5 The instructor(s) know(s) more about
performance driving
than I do.
6 I will try to ride some with at least one instructor and observe how
he
drives the course.
7 I will learn from better drivers.
8 I will drive the
line
the instructor teaches me. ����
5.2.3
PSYCHOLOGY
Concentration and focus are very important. If your mind wanders, you
will miss things.
Visualize the entire
line
through the turn or sequence of turns. If you just concentrate on your
next "target", your driving will be jerky as you "connect the
dots". Also, you may miss exciting things happening ahead of you such
as a car spinning out at the exit of the turn while you are focusing
on the
apex
.
In his book "
Twist of the Wrist"
, Keith Code talks about an
attention budget
. When you first start driving on a track, you have a lot to
concentrate on, and not enough time to concentrate on it. As you get
more practice, many things (such as shifting smoothly) will take less
concentration, which will leave more for other things.
Slow in the cockpit means fast on the track. When you start driving
"over your head" and overspending your attention budget you get
flustered and start making mistakes. This is another way of saying
"Slow down to go faster".
Think about this: You can never go faster than you want through a
corner.
5.2.4
SLOW DOWN TO GO FASTER
One of the great paradoxes of
performance driving
is often, as soon as you stop trying to goas fast as you can, your lap
times decrease. There is a good reason for this: when you are pushing
yourself and your car to the limits you will make mistakes. Then you
will have to correct for these mistakes, which can cause you to be in
the wrong place a little further down the track. Soon you find
yourself spending a lot of time and energy reacting to and correcting
things that have gone wrong.
On the other hand, when you slow down and concentrate on doing things
correctly, you do a better job of driving the
line
. When you aren't pushing yourselfso hard, you drive smoother and make
fewer mistakes, leeting you drive closer to the limits of the car.
This principle works for experienced drivers as well as novices. I was
co-driving a friend ’s car in a three hour enduro. The track had
been wet for my practice session, so I was not very familiar with how
the car handled in the dry. Since it was a race, I was driving as fast
as I could. I kept making mistakes, missing
apexes
, and not driving smoothly. Each time I'd make a mistake, I got upset
at myself and a little bit tenser. I finally realized what was
happening and concentrated on relaxing and "centering myself" (a
concept familiar to students of martial arts or meditation). I worried
less about driving fast and more about driving well. As a result, my
laptimes improved significantly.
5.2.5
BRAIN FADE
People have been known to do incredibly stupid things at the race
track. For example, concentrating so hard on the person trying to pass
them, they forget to brake for the turn at the end of the
straight. These mental lapses are referred to as
brain fade
. The more tired you are, the more likely you are to exhibit
brain fade
. If you notice yourself doing stupid things, do yourself a favor and
pull into the pits to rest. It's better to pass up a few minutes of
track time than to do something stupid and destroy your car, hurt
yourself, or worse yet, destroy someone elses car and hurt them.
5.3
PRACTICE EXERCISES AND DEMONSTRATIONS OF PRINCIPLES
5.3.1
EXERCISES
There are several exercises you should do that will demonstrate
various principles in this book. Do them to reinforce the book
learning and improve your driving. All you need is a large, empty
parking lot and a few plastic cones or garbage cans.
5.3.1.1
EXCESSIVE STEERING
Find someplace flat and level, put your car in neutral, turn off the
engine and take off the brake. Straighten the wheel and push the
car. Now turn the wheel so your front wheels are turned about 15
degrees. It's not very much is it? Now try pushing the car. See how
much more difficult it is to push.
5.3.1.2
HOW WIDE IS YOUR CAR?
Take a couple of plastic garbage cans or pylons (that won't do damage
to your car) and set them up so you have a foot of clearance on each
side of your car. Practice driving through them. Then move them
closer together and repeat.
5.3.1.3
THRESHOLD BRAKING
This requires a parking lot where you can safely get your car up to
about 30 miles an hour and come to a stop in a straight
line
. Get your car up to speedand practice braking as hard as you
can. Learn what the car feels and sounds like as the wheels start to
lock up.
5.3.1.4
HEEL-AND-TOE DOUBLE-CLUTCH DOWNSHIFTING
Practice this technique in your everyday driving. At first you may
want to simply try heel-and-toe
downshifting
(one press of the clutch and blip of the throttle).
5.3.2
HOW TO WALK (AND LEARN) A TRACK
In order to walk a turn, first walk through each turn noting important
landmarks. When you get to the exit point (where the car will be at
the outside edge of the track and pointing down the straight), turn
around. Now that you know where you have to be, you have to figure out
how to get there.
By looking backwards from the exit, you can see where you have to
apex
to make it to the exit.
Now walk countercourse along the
line
to the
apex
. From the
apex
you can see what you have to do at the entrance to make it to the
apex
. Walk back to the entrance/turndown point.
Once you know where you have to go, walk the turn from where the
driver's seat would be. During this whole procedure make notes in
your driver's journal. Note that landmarks that may be very obvious
when walking the track at three mph will disappear when entering the
turn at upwards of 90 mph. Go back and modify your notes after driving
the course.
If you are faced with a series of turns, you may have to repeat this
whole procedure for the entire series. Start at the exit of the last
turn and walk back to the entrance of the first.
5.3.3
APPLYING THESE SKILLS ON THE STREET
Almost all of the techniques taught here can be practiced on the
street. I am not refering to driving the car at the limit of its
abilities (or yours) but to such things as proper
line
, smoothness, steering and shifting techniques. One exercise that can
be done on the street to learn exactly how wide your car is, is to
just barely nick a single Botz dot when you
apex
a turn. This also requires that you decide where to
apex
the turn before you enter it. Of course, you must make sure you don't
hit a car in the other lane while trying this.
There are many advantages to using
performance driving
techniques on the street. The mostobvious is safety; it gives you more
control of the car at any given speed. Another advantage is
smoothness; unsmooth driving seems faster and is less comfortable
(both physically and psychologically) for the passengers. Therefore,
if you are driving smoothly your passengers are a lot less likely to
complain about you driving too fast, even if you are driving faster.
As far as a test of skill goes, it can be more challenging to see how
smoothly you can drive a windy road than how fast you can. But be
careful, often when you slow down and work on smoothness, you end up
going faster. Unfortunately neither police nor judges seem to
appreciate that by driving more smoothly you are actually safer at 10
mph above the speed limit than you were before you took a
performance driving
school.
5.3.4
AFTER THE SCHOOL
Concentrate on smoothness rather than on speed. Over time, you will
notice improvement in your driving as you assimilate all of the skills
you started to learn on the track.
5.3.5
OTHER PLACES TO PRACTICE
1)
Autocrossing
, also known as gymkhanna: Autocrossing is very good practice. You can
autocross just about any car. It is relatively cheap. It teaches you
about
line
, setting up sequences of turns and how to learn a track in a
hurry. It does not provide wheel-to-wheel competition (This can be
either a bug or a feature). Many people complain that you only get a
few minutes worth of track time for the day (or half day) spent at the
autocross. Think of it as spending the afternoon hanging out with some
friends, and getting in some driving while you are at it.
I have noticed that autocrossers tend to do better on road courses
than roadracers do on autocross courses. Autocross courses tend to be
slower and tighter than road race courses, top speeds rarely exceed
50-70 mph. They are also designed to be safe to drive at (or beyond)
the limit in street cars.
2)
Malibu Grand Prix
: Similar to autocrossing, except the course doesn't change, you're
thrashing someone elses car and you don't have to spend all afternoon
for three runs. It can get fairly expensive, but as dollars/hour and
hours work/hours of play go it is still pretty cheap track time. Some
people have difficulty fitting in MGP cars though.
3)
Video games
such as Hard Drivin' and Virtua racing: These can be a fairly
realistic model of a cars driving characteristics. You lose a lot in
seat of the pants feel and there is no recovery from a spin, but many
of the same theories about
line
, smoothness and car balanceapply.
4)
Stupid little go-kart tracks
: I recently went to a track which charged three dollars a session to
ride around on underpowered little go-karts. It was more fun than I
expected. It really rewarded proper
line
.It was also wheel-to-wheel, so the benefits of the qualifying
line
versus the
defensive line
became very apparent.
5.3.6
PRACTICE SESSIONS
Drive your own car. Chances are the other students are doing it wrong,
otherwise they would be the teachers. If you imitate another student,
you may be learning it wrong.
Again, remember, you can't win a practice session. Don't wreck your
car trying some stupid stunt.
Be polite. Watch your mirrors. If someone is dogging your tail
through the turns, point him by on the straights. A Bugeye Sprite on
racing slicks can go around turns like it's on rails, but there is not
a chance in the netherworlds it can out-accelerate some V-8 behemoth
from Detroit.
When learning a racetrack it is prudent to brake early and
apex
late. Slowly move your
apex
back, until you are using all your handling and all the track at the
exit. Then move your
braking point
up so you are using all your braking and handling to get to the
apex
. You could try it the other way around, late braking and
early apexing
, but that can get a bit expensive in replacing your car.
If you are working on a series of turns and are having trouble with a
later turn, you could be taking the early one(s) wrong, setting you up
wrong for the later turn. Remember that speed is more important
exiting the turn leading onto the straight than in a turn leading into
another turn.
If you are working on taking a series of turns flat out, take the
first one flat out before you take the last one flat out. You might be
able to take the last one flat when you brake for the first, but when
you start taking the first one flat you find you run out of track if
you try to take the last one without lifting.
If you are behind an instructor, follow his
line
. There is a reason he's the teacher and you arethe student, he will
almost certainly be taking a better
line
than you. Often a teacher will tap or point to the roof of his car. He
is not telling you a bird just left its calling card. He is
signalling for you to follow him and to drive the same
line
as him.
When in a follow-the-leader session, follow close. This isn't the
public highway where you will get a ticket for tailgating. If each
student leaves a lot of space between him and the car in front of him,
it will be well nigh impossible for the last student in line to see
what the instructor is doing. If you can't keep up through the turns,
catch up on the straights.
Be aware that teachers do make mistakes. If you are doing exactly what
he does and it doesn't work, remember what you did and avoid doing it
in the future.
Don't crowd other drivers unnecessarily. Leaving more room gives you a
chance to start accelerating earlier out of the turn to help set up a
pass on the exit. This is known as setting up a pass. As you become
more advanced, practice different
line
s through turns, but do not vary your
line
from the standard "qualifying"
line
until you have become goodenough to consistently hit every
apex
and exit point. Ask your instructor about various
line
s and when you should start trying them.
5.3.6.1
IF YOU ARE STUCK BEHIND A SLOWER DRIVER
Pull into the pits and wait for a break in traffic. If someone is
caught behind you, wave him past. There are few things in life more
frustrating than being caught behind some dufus in a big hulking car
who rockets down the straights and parks it for the turns.
If your lights are taped over with a plus (+) of tape rather than
completely covered, try blinking your lights to get his
attention. Don't distract him by honking your horn when he is at the
apex
of the turn.
If the person ahead of you is only a little slower than you, back off
a bit and work on driving better rather than driving faster. This will
give you a chance to see how it feels to hit
all
the
apexes
. Often the other driver of the slower car is better than you on some
section of track. Note what he does different and learn it.
5.4
TIPS FOR DOING BETTER
To make them easy to remember, I have tried to keep these hints as
short and simple as possible. Discuss them with your instructor.
5.4.1
WHERE TO LOOK
Look down the track.
The further you look ahead, the more stable the car will be. Also the
more time you will have to avoid any unpleasantness ahead.
Look where you want to go.
It is a funny thing, but people tend to drive where they are
looking. This means that if you look where you want to go, you will
likely end up there. It also means that if you look at where you
don't
want to go, you will still end up there. This is known as target
fixation. Often times, when cresting a hill, it is impossible to see
the
apex
to aim for it. Usually there is a speaker post, or lamp pole or a tree
you can use for a reference point.
An extension of this concept is that you want to look at where you
want to go, not where you want to be. In other words, on the entrance
of the turn you should look through the
apex
to the exit rather than fixating upon the
apex
.
Talking around a track.
I find it helpful to come up with a monologue for a track. I talk
about what I will be doing next. This has two benefits. It helps me
remember reference points and also helps me to focus on what I am
doing (driving) rather than other things.
When riding with students, I occasionally have them tell me what they
will be doing a few steps ahead of where they are, for example, by the
entrance of the turn they are telling me what they will be doing at
the exit. There is almost always a significant improvement in their
technique while they are doing so.
Looking and thinking ahead.
Thinking ahead is very important. If you are not aware of what is
happening, and what
will be
happening, YOU WILL get in trouble. It is better to note that the car
up ahead is apexing early and will probably spin, than to suddenly
find your
apex
filled with a spinning car and wonder where the hell you can go now.
Watch the workers.
Not only is it important to see things such as yellow flags, but by
watching the body langauge of a worker, you can see him reacting to an
incident before the flag even comes out. Also, in a race, the flaggers
communicate with hand signals. They tell each other all sorts of
interesting things: the session is half over, one lap to go, there is
a checkered flag out, there is oil on the track, put up the oil flag.
5.4.2
RAIN
Learning in the rain is a great opportunity.
You can be driving at the limit and not be going too fast. That way
when you make a mistake, it does less damage to your car. Learning in
the rain also really teaches smoothness.
Rain is the great equalizer.
It doesn't matter how much horsepower someone has if they can't get it
to the track.
On a damp (not wet) track, the
line
is dry.
Conversely if you get off the
line
, you willlose a lot of traction. Be very careful when attempting to
pass on a damp track.
5.4.3
SURFACE CONDITIONS
Anti-freeze is almost invisible.
If someone dumps coolant, hopefully "grease sweep" will be put
down. Look for the grease sweep. Be thoughtful of other drivers and
use either pure water or a product like Red-Line's Water Wetter (tm)
instead of Ethylene Glycol.
If someone dumps a bunch of oil or coolant exactly on the
line
, there is no need to driveoff
line
. Straddle the spill.
If on your warmup lap you notice a bunch of grease sweep in or near
the
line
, drive throughit and help clean off the track. You should be going
slow enough on your warmup lap that driving through grease sweep
shouldn't cause you to lose control.
5.4.4
ETIQUETTE
Watch your mirrors.
Let faster drivers pass so both of you can concentrate on learning at
your own pace.
Wave to the workers.
At the end of the session, wave to the workers, thank them for being
out there. Remember: no wave, no save.
Be ready to go on track before your session starts.
Not only do you not want to miss track time, but you don't want to
make your fellow student miss any time.
5.4.5
TECHNIQUE
On a rough surface, you can ’t push as close to the limits of
adhesion as you can on a smooth surface.
Cars are more stable when accelerating.
When in doubt, gas it.
Fast in the fast parts, slow in the slow parts.
Experience (or your teacher) will tell you which is which.
If you consistently have trouble in a particualr turn, slow down more
or sooner, entering it. Some turns, when done right, give you the
feeling you could have gone through them a lot faster. But when you go
faster, you end up overcooking the entrance and blowing your whole
line
through the turn.
Stirling Moss once said about turns: "Better in slow and out fast than
in fast and out dead."
5.4.6
PREPARATION
DIRTFT (pronounced "dirt foot") Do it right the first time.
Don't fudge on car preparation. Don't assume something is adjusted
properly. Make sure everything is done properly before you get to the
track, or you will have to fix it at the track.
Keep a driver's journal.
A driver's journal can be incredibly valuable. My budget doesn't allow
me to go racing every weekend, but by looking at my notes on a track,
I can get a major head start bu using what I learned in previous
driving sessions. I am also putting together a library of video tapes
of walking and driving different courses with narration.
Bring a reliable car to the track.
You can't learn about driving if you spend the day fixing the car.
Make sure the car is reasonably quiet.
It doesn't matter if you are a couple of horsepower down, a school is
not a race. Some tracks won't let you run if you are too loud. If you
have any doubt about passing the sound check, bring an extra silencer
you can bolt or clamp on the end of your exhuast pipe.
Until you become very consistent (+/- 0.5 seconds a lap) don't make a
lot of adjustments to the car. You won't learn anything. Was the
change in lap time due to the car or the driver?
5.4.7
PRACTICE AND WARM UP
Drive a variety of vehicles on a variety of tracks.
Learning how to compensate for a weakness on a vehicle where it is
very pronounced makes it a lot easier to correct for it in a vehicle
where it is less obvious. For example, driving an underpowered car
will emphasize the importance of unwinding the steering wheel as early
as possible while exiting a turn. While not as noticable, it is just
as important for getting the maximum performance out of higher powered
cars.
Cold tires don't stick as well as warm tires.
For that matter "cold" drivers don't drive as well as "warm"
drivers. Take it easy the first couple of laps to give you, your car
and your tires a chance to warm up.
Slicks have a much greater difference in traction between dirt and
pavement than do street tires. Two wheels in the dirt is not much to
worry about with street tires, but it can be very exciting on slicks.
If you are driving on street tires that make a lot of noise as they
approach the limit, use the squealing as feedback on how you are
driving. As you turn in, the noise should increase, then it should
stay at the maximum and smoothly decrease. If the squealing does not
smoothly ramp up, then down, but comes and goes, you are not driving
smoothly.
5.4.8
SCHOOL
It is up to you to make sure you receive the amount and type of
attention you need. Different instructors give different types and
amounts of feedback to different students. If you are not getting the
amount or type of attention you need, ask for it. If it still is not
forthcoming, change instructors.
If you have the opportunity to take a school several times, try to get
different instructors. Each one will be better at teaching different
things.
At the beginner level, the fact that your instructor drives a
different car than yours is not important. Vehicle differences do not
start becoming important until the intermediate level classes.
Don't blame the equipment.
Your goal is to learn how to get the most out of your, car, not to go
faster than someone else.
You can learn only so much by reading.
Read the rules and know them.
Anything that can go wrong will.
Things that can't go wrong will.
Never underestimate human stupidity.
5.4.9
BAD HABITS AND COMMON MISTAKES OF STUDENTS
There are certain mistakes everyone makes while they are
learning. Some people only make certain mistakes for a short while,
some people never break the habits.
Not using the whole track:
Students seem afraid to take their car all the way to the edge of the
track on the entrance or exit of the turn. This is bad for several
reasons. First of all, you cannot go as fast through the turn. Second,
turning the wheel more than you need scrubs off extra speed. And
third, when you start driving fast enough to need the entire track,
you won't be used to driving there.
Passengers with arms outside the car:
Many schools do not allow students to take passengers for rides. At
those that do, I often see passengers holding onto the roof or side of
the car with one hand. Bad idea-if the car rolls, they lose their arm.
Passengers talking to the students:
I once saw a student drive his car off the track because he was trying
to pay attention to the advice his passenger was giving him. Unless
the he is the instructor, the passenger should keep quiet and let
student con centrate on what he is doing.
Taking foot off the gas and coasting up to the
:
It has been said that when you are racing, you should have your foot
either all the way on the gas or all the way on the brakes. It would
be more accurate to say that unless you are specifically setting up a
sequence of turns, you should keep the car on the edge of
. Coasting for 50-100 yards before you put on the brakes does
neither. Practice, smoothly, and quickly, taking your foot off the gas
and putting on the brakes.
Turning in too slowly:
The quicker that you smoothly turn in, the longer you can wait to turn
in and still make it to the
apex
. Except for the middle of class 3 turns where you are sacrificing a
little bit of speed to set up a more important turn later, your car
should either be accelerating, braking or turning at the limits of its
ability. Don't waste time in transition. If you turn in too slowly,
even if you start your turn in where you should, you will miss the
apex
, or
apex
way too late.
Playing with the gears too much.
Shift as few times as possible while keeping the car in the
powerband. It ’s generally not worth shifting if you will only
be in that gear for a couple of seconds.
Talking to the instructor when he is riding with you.
(Admittedly instructors are often guilty of prolonging conversations)
When on the track, concentrate on your driving. If you have a question
you MUST ask, do so on a straight when you aren't busy doing other
things.
Overdriving the cooldown lap.
Driving the cooldown lap at 90 percent while your brain is at 50
percent. Slow way down on the cooldown lap, and use the lap as an
opportunity to make sure you get every turn perfect.
Focusing on the car ahead or behind and not paying attention to your
own.
If you concentrate too much on what the car ahead is doing, you will
probably just make the same mistakes as him. If you spend too much
time looking in your mirrors, you will probably miss your reference
points and not brake or turn soon enough to keep your car on the
track.
Fixating on reference points rather than using them.
The result is a jerky "connect the dots" style.
Not letting out the steering as soon as possible.
The more and the longer the steering wheel is turned, the more you
slow down the car.
Resting a hand on the shifter.
Keep both hands on the wheel, except when you must take one off to do
something, then put it right back.
Not making one smooth turn out of the curve.
Increasing and decreasing the amount of steering several times through
the turn.
5.4.10
RULES TO LIVE BY
������������������������
Keep the round black things on the flat black thing.
Keep the shiny side up.
Keep the clear glass things in front of the red plastic things.
Don't attempt to violate the Pauli principle.
Enjoy yourself.
��������������
SECTION 6
ABOUT THE SCHOOL
6.1
WHAT YOU SHOULD LEARN
BEGINNER
Safety:
Flags, signals, etiquette.
Line:
Braking, turndown,
apex
and exit points
Establish visual markers
Finding and consistently using good shift and
braking points
s
INTERMEDIATE
Brake modulation.
Move up
braking point
s to threshold straight line braking.
Trail braking (if appropriate to car)
Throttle modulation learn to steer with the throttle.
ADVANCED
Counter steering, deliberate
oversteer
.
Add speed, rotation drifting
Fine tuning of skills per individual need.
6.2 FLAGS AND SIGNALS
Know, respect and OBEY the flags.
Respect the flaggers. If it weren ’t for them, you wouldn't be
able to be out there having fun. White clothes, however, are not as
good protection as a roll cage. They aren't much protection at all. If
there is an incident there may be flaggers responding to it, so slow
down and be extra carefull for the sake and safety of the flaggers.
Wave to the flaggers after the session.
Go out and do some flagging, it is a hell of a good way to learn a
corner. It is also a lot of fun.
If someone is faster than you, point him by by pointing to where you
want them to go. If you point to your left, you are telling them to
pass you on the left. But be careful: they may pass you on the
right. I once pointed someone by on the inside (to the left), but he
didn't see my signal. Fortunately no damage was done when I pulled
over to the right to let him by, and forced him into the dirt. The
overtaking driver does not have to go where you point. Be
predictable. As long as he can tell where you are going, he can make
sure he doesn't hit you.
If you have to slow down, or if you are pulling into the pits, put a
hand in the air.
WHAT THE FLAGS MEAN
THE FLAGS HAVE CHANGED SINCE THIS WAS WRITTEN
(As used by the SCCA and NASA, in northern California.)
Standing Yellow Caution, Do not pass until after the incident. Slow
down. ������������������������
Acknowledge the flag.
Waving Yellow Prepare to stop. Do not pass until after the
incident. Slow down. Acknowledge the flag.
Red and Yellow Stripes There is stuff on the track. Usually called the
oil or the surface flag. Although it may be anti-freeze, dirt or bits
of race car.
White Slow vehicle on course. Usually a tow truck or ambulance. Or it
may be a race car at 1/2 speed or slower. It does not mean one lap
left.
Blue and Yellow Check your mirrors. It does not mean move over.
Red Carefully come to a stop. First, check your mirrors and make sure
there isn't anyone right behind you. Don't do any sudden or stupid
moves. Pull to the edge of the track and come to a stop so that the
people behind you have a place to stop as well. In the San Francisco
Region of the SCCA it is displayed only at the Start/Finish
line. There will be black flags displayed at all stations.
Black Black flags are only displayed at black flag stations. At Sears
Point this is Start/finish, turns 5 and 9.
Furled black
You were naughty; don't do that again.
Open black
Come into the pits and talk. Stop at the black flag station in pit
lane.
Meat ball (
Black flag with red dot) There is something wrong with your
car. ��Report to the black flag station.
Black flag all
(B.F.A.)Everyone pull into the pits. In a B.F.A. there will be yellows
displayed all around the course.
Pace car ����
Group up behind the pace car. Do not pass it or other cars. Drive
slowly near the incident but at a good clip elsewhere. Watch out for
workers and emergency vehicles on the track. Often there is a sign
saying "Pace Car" displayed at Start/Finish.
Checkered
����The session is over. Take a cool down
lap and pull into the paddock.
Fire Bottle
��������In the
San Francisco Region, when turn workers wave a fire bottle at you, it
usually means your car is on fire. Pull off close to a turn worker
with a bottle so he can put out the fire. Do not park in tall grass if
you suspect that your car is on fire.
6.3
PREPARE THE CAR BEFORE THE SCHOOL
Driving a car on the track puts much more stress on it than street
use. A marginal part that could last for thousands of miles of street
driving will quickly break at the track. At the very least this will
cause you to miss track time. At the worst it could cause you to have
an accident and hurt your car, someone else's car, yourself or someone
else.
Clean all mechanical parts of the car. Not only is it easier to detect
leaks, but the process of cleaning everything forces you to look at
everything. Many serious problems have been found when cleaning the
offending part.
A clean car gets through tech inspection a lot easier.
Make sure all nuts and bolts are tight, especially on the suspension
and exhaust.
Make sure the brakes are fresh. If the car can be driven on the
street, bed them in before going to the track.
Make sure the car is running properly. If the car is running poorly
you will spend your concentration trying to figure out the problem
with the car, rather than the problems with your driving.
Remove hubcaps and trim rings. They might come off under hard
cornering.
6.4
WHAT TO BRING
6.4.1
FOR PEOPLE:
Food Do not assume there will be food at the track. Even if there is,
and you can afford it, and it is edible, you may not have time to wait
in line to buy it. Bring real food, not just junk food. Driving is an
athletic activity: eat like an athlete, protein, fruit, complex
carbohydrates.
Water Drink lots of water. Avoid caffeinated drinks during the
day. They dehydrate you, impair concentration and make you need to use
the restroom when you should be concentrating on your
line
. Bring some fruit juiceand "sports drink". There are two things to
know about sports drinks: they are more palatable when mixed down to
about half concentration and, if they taste good, you need them. If
they taste bad, then water will do you as much good.
Clothing Be prepared for any kind of weather from blazing hot to
freezing rain. It is a good idea to wear a driving suit on the
track. At the very least, wear long pants and shirt made of a natural
fiber. Washing them in borax will add a little bit of fire retarding
ability.
Chairs Bring something to sit on at meetings or between sessions.
Hat Wearing a hat between sessions makes it a lot easier on you. It
will keep the sun or rain out of your eyes and keep you from getting
as sunburned.
Sunscreen You will be outside almost all day long. Unless you are
habitually outside all day, if you don't wear sunscreen you will get
sunburned. This discomfort will distract you and make it harder to
concentrate on driving.
Notebook Start a driver's journal. Make notes about your driving
technique and how to deal with specific turns. Write a description of
a lap of the race track. Also note your instructors comments and
suggestions. Writing these things will help you organize your thoughts
the day of the school. They will also be valuable when you next go to
that track.
A couple cans of cola For the drive home. It is common to not realize
how tired you are until you start to relax about an hour into the
three hour drive home. The little boost from the sugar and caffeine in
a can of cola can help you keep alert. If you extremely tired, do
yourself a favor and pull off the road and take a nap.
6.4.2
FOR THE CAR
Gas Make sure you have a full gas tank when you get to the
track. Bring extra gas for the course of the day. Cars get miserable
gas mileage while on the track, often less than half of what they get
on the highway. There is often a place that will sell gas at the
track, for about 50 percent more than the normal cost, if they are
open and haven't run out.
Oil Bring a few extra quarts of oil. Sometimes cars do weird things
when you start pushing them hard.
Coolant Cars that usually run cool will often overheat at the
racetrack. People rarely drive their cars flat out for a half hour at
a time on the street. Use either pure water or an additive such as
Redline Water Wetter (tm). Antifreeze (ethylene glycol) is extremely
slippery, and is nearly invisible on the track.
Brake pads and fluid Cars go through brakes a lot faster on the track
than they do on the street. Some heavy cars (like Mustangs) can go
through two sets of pads in a single day at the track.
Tools , including:
Lug wrench
��������Make
sure your lug nuts are properly torqued down.
Tire guage Make sure your tire pressures are set correctly before you
leave home
Jack A good floorjack will pay soon for itself in time and bother
saved.
Jack stand
����������Never
leave a car up on a jack. Jacks are designed to lift the weight of a
car, but not to hold it up.
Boards to put under jackstands ����To keep
the jackstands from punching grooves into the pavement.
Steel wire:
��������aka
safety wire.
Duct tape ���� The force. It has a light
side and a dark side and it holds the universe together.
Hose clamps ����Get the good stainless
steel ones, with a strip to keep the grooves from cutting into the
hose.
Window cleaner ���� Life at the track is
much more pleasant when you can see clearly.
Paper towels ����For cleaning windows,
spilled oil, wiping off your hands. Even
if you bring shop rags you will want to have clean paper
towels.
6.4.3 WHO TO BRING
Bring someone to help you. Having a crew will allow you to
concentrate on learning to drive without having to worry about
logistics.
There are two very important jobs: the
Crew Chief
who takes care of the car and the
Pit Mom"
, who takes care of the people. If need be, both jobs can be done by
the same person.
Crew Chief
����������Before
every session the crew chief should check the car. Here is a minimum
check list:
All of the fluids are at the correct level.
The car isn't leaking anything,
The windshield and windows are clean.
The car has enough gas.
Nothing that is supposed to be tight has come loose.
The brake pads are in good shape.
Clean everything between sessions.
Pit Mom When people are excited or stressed they often forget to take
care of themselves. This is why it is important to have a Pit Mom to
make sure that people:
eat
drink
go to the bathroom before going out on course
are ready to go on track on time
6.6 CHECKLISTS
The following checklists were provided Scott Griffith, a friend who
frequently takes his Mustang GT to track events. Feel free to make
copies of the checklists.
� 6.6.1 PRE-EVENT CHECKLIST
Front suspension: Rear suspension:
_____Wheel bearings cleaned and repacked
______ Rear control arm mount bolts checked
_____ Wheel bearing play checked
_____ Rear control arm pickup points checked for fatigue
_____ Wheel bearing preload nut cotter secured
_____ Rear shocks adjusted to track settings
_____ Dust cap peened in
_____ Rear shock eye bolts tight
_____ Ball joint stud nuts tight, cotters secured
_____ Pinion seal checked for leakage
_____ Ball joints lubed, excess wiped dry
_____ Pinion drive flange bolts tight
_____ Strut to spindle mount bolts checked
_____ Gear oil changed
_____ Axle shafts checked
_____ Antiroll bar mount bolts checked ____ Outer bearings checked
_____ Antiroll bar end links tightened and checked
_____ Rear cover bolts retorqued, rear cover dry
_____ Front control arm mount bolts checked
_____ Gear oil level checked
_____ Control arm bushings lubed (if applicable)
_____ Axle breather tube checked
_____ Struts adjusted to track settings
_____ Race rubber mounted
_____ Strut mount plate nuts torqued
_____ Wheel nuts torqued
_____ Bump stops checked
_____ Tire pressure set
_____ Race rubber mounted
_____ Wheel nuts torqued Rear brakes:
_
____ Tire pressure set
______ New pads installed
_____ Rotor health check
Front brakes:
_____ Caliper bolts tight
_____ New pads installed
_____ Caliper mount plate bolts checked
_____ Caliper bolts tight
_____ Brakes bled, bleeders tight and dry
_____ Rotor health check
_____ Fluid reservior full
_____ Ducts in place, mountings checked
_____ MC mount nuts checked
_____ Brakes bled, bleeders tight and dry
_____ Max pressure pedal check
_____ Fluid reservior full
_____ Flex lines checked
_____ MC mount nuts checked
_____ Seals and unions checked and dry
_____ Max pressure pedal check
_____ Rear axle outer seals checked for leakage
_____ Flex lines checked
_____ Seals and unions checked and dry
_____ MC flare nuts tight and dry
_____ Prop valve/hard line tee flare nuts tight and dry
Cockpit: Steering:
_____ Fire bottle bracket mount checked
_____ Steering centered
_____ Fire bottle in place, charged, pin in place
_____ Rack mount bolts tight
_____ Harness mount eyebolts secure
_____ Tie rod stud nuts tight, cotters secured
_____ Belt check
_____ Tie rod jam nuts tight
_____ Seat mount bolt check
_____ Tie rod ends lubed, excess wiped dry
_____ Brake bias set to baseline
_____ Steering coupler upper and lower bolts tight
_____ Ohshit lights in place
_____ Steering coupler fabric disk health check
_____ Power steering fluid checked
Electrical:
_____ PS fluid seals and unions tight and dry
_____ Check brake light function
_____ Battery holddown secure
_____ Battery connections insulated
Engine: Transmission:
______ Oil changed
_____ Clutch free play checked
_____ Oil level checked, cap tight
_____ Clutch cable checked
_____ Sump plugs in place, torqued
_____ Trans oil changed
_____ Filter in place, torqued
_____ Trans filler and drain plugs checked
_____ Water level checked
_____ Trans tailshaft seal checked and dry
_____ Plugs installed and torqued
_____ Rear main seal dry
_____ Plug wires tight and clear of headers
_____ Gear selector lever mount bolts checked
_____ Serp belt checked
_____ Gear selector mount bolts checked
_____ Fuel lines and unions checked
_____ U-joints checked
_____ Oil lines and unions checked
_____ All gears engage
_____ Oil cooler checked for cracks
_____ Oil cooler mount checked
_____ Water hoses and clamps checked
_____ Valve cover bolts checked
_____ Throttle return springs checked
_____ Throttle plate opening checked at WFO
_____ Header bolts checked
_____ Collector bolts checked
_____ Exhaust system hangers checked
_____ Air pump plumbing clear of headers
_____ Clutch cable clear of headers
_____ Air filter cleaned
_____ Air filter housing secured
_____ Air inlet plumbing checked
_____ Catch tanks emptied
6.6. Spares box checklist:
_____ Motor oil
_____ Trans oil
_____ Gear oil
_____ Synthetic grease
_____ Brake fluid
_____ Brake pads
_____ Front brake rotors
_____ Brake cleaner
_____ Throttle return springs
_____ Wheel bearings
_____ Cotter pins
_____ Caliper mount pins
_____ Serp belt
_____ Spark plugs
_____ TFI module
_____ Fuses
_____ Front hub dust caps
_____ Nuts and bolts box
_____ Hose repair kit
_____ Windex and towels
_____ Duct tape
_____ Duct tape
_____ Duct tape
6.6.2 Pre-tech checklist:
______ Lights taped
_____ Numbers in place
_____ Brake light function checked
_____ Fire bottle charged, mount tight, pin in
_____ Spare tire well empty
_____ Belts in place
_____ Helmet bags in car
_____ Throttle return spring checked
_____ Wheel bearing play checked
_____ Leak check- rear main, trans tailshaft
_____ Catch tanks in place
_____ Battery mounts secured
_____ Trunk empty
_____ Passenger compartment empty
_____ Glovebox empty
6.6.3Pre-grid checklist:
_____
_____
_____
_____
_____ Tire pressures checked, caps installed
_____
_____
_____
_____
_____ Struts at track settings
_____
_____
_____
_____
_____ Shocks at track settings
_____
_____
_____
_____
_____ Wheel nuts torqued
_____
_____
_____
_____
_____ Engine oil checked
_____
_____
_____
_____
_____ Power steering fluid checked
_____
_____
_____
_____
_____ Water level checked
_____
_____
_____
_____
_____ Brake pad health check
_____
_____
_____
_____
_____ Rotor health check
_____
_____
_____
_____
_____ Enough fuel?
_____
_____
_____
_____
_____ Brakes need bleeding?
_____
_____
_____
_____
_____ Tires need rotating?
_____
_____
_____
_____
_____ Anything dripping or dragging?
_____
_____
_____
_____
_____ Passenger seat back secured
_____
_____
_____
_____
_____ Helmet in car
6.6.4 After the day is over:
_____ Remove tape from lights
_____ Clean up Paddock
_____ Thank and feed crew
_____ Write up / update track description and track notes.
6.7 NOTES FOR INSTRUCTORS
Teaching isone of the best ways for an experienced driver to improve
his driving. It forces you to think about all those little things you
have forgotten. However, it is also very to get caught up in your
ego. Remember, you are here to teach students how to drive, not to
show them how well you can.
In the "follow the leader" session exaggerate your line and have your
students do the same. Put two wheels off on the entrance and exit,
put your wheels way up on the
acceleration
at the
apex
. This will teach your students the real width of the track. (Use
common sense as to the speed and location that you put wheels off, don
’t do it when it would cause your students problems if they
followed you) Emphasize that they need to follow you closely. Give
them signals to give you if they are uncomfortable with the speed.
Show your students a signal that means "follow me" or "follow me
closer". Usually tapping on the roof above your head.
Have your students drive the exaggerated
line
on the warm up and cool down laps as well.
Show the students the difference between a quick turndown and an
abrupt one. Have them do turndown exercises with you in the paddock.
Show them still hands-signal, smooth progressive motion on the wheel.
If you are taking your students for a low speed drive around be sure
to show them:
Apexes and turn down points.
Places where braking and shifting can be done, if needed.
Turn worker positions. Remember, a single turn may have a
communicators stand, a fire station, and two flaggers stations.
Taking your students for "hot" laps is an excellent way to give them a
seat of the pants feel for what a car can do. There are several things
you should keep in mind:
Use your own car. On more than one occasion an instructor has rolled a
students car up into a little ball showing them "how it's done".
Don't drive 10/10ths. The point is to show them the right way to do
it, not how fast it can be done. Back off a little bit so you smoothly
hit all of the entrances,
apexes
and exits.
Don't fall into the ego trap. It is very easy to scare the
students. Remember, not only have they never driven this fast, but
when you are giving them a ride, they have no control of the
situation. Something many people find even more frightening than the
speed.
Demonstrate, at half speed, how to go four-off and how to get back on
safely. (This can be done at turn 10 at Sears Point and turn 3 at
Laguna Seca. )
After a track session, have the students critique themselves and each
other.
Bring some small toy cars to use as teaching aids. Make sure however
that the "track" is in scale to the cars.
Teach the "what to do when things go wrong" section early. Students
seem as able to get into trouble in their first session as their last.
Good flaggers are very important. Get trained flaggers from the local
SCCA or equivalent.
Ask students for feedback at the end of the day.
Mark the instructor cars on the front as well as the sides and back so
students can see it is an instructor behind them.
If you are riding at speed with a student, or one with you, don't try
to hold a conversation. If you must make comments, keep them short,
few and easy to understand, and only talk to your student on the
straights. It is hard to hear on track and talking uses up too much
of the "attention budget".
Don't frighten the students. There is no need, or excuse, for bonzai
passes by instructors.
Some students gain confidence slower than others. Be patient.
Remember, your first obligation is to teach . Hopefully you will have
fun, and maybe even get some track time in as well.
Ask students about experience and goals. Tailor your lectures and
emphasis to your students needs and goals. Except for schools oriented
towards racing, most students take
performance driving
schools to improve theirstreet driving, or just to have some fun
driving fast. Attempting to teach these students racing techniques is
not very productive.
Find out if any students are uncomfortable with following close, or
with being followed closely. Make sure that they are at the back of
any "follow-the-leader" packs.
How to deal with a student who won't listen. Is he actually a hazard
to himself or others? If not, then let him have fun. If he is only a
hazard to himself, warn him that if he doesn't do things differently
he is likely to learn a very expensive lesson.
If you feel that someone elses student is a hazard on the track talk
to either the instructor or the school administration. It is not
possible for an instructor to see everything that all of his students
do.
Have students describe a lap of the track. Describing a lap while in
the paddock makes it easier for them to remember what to do when they
are on the track.
Bring someone to crew for yourself as well. If you have to deal with
your own car, you won't be able to devote 100 percent of your
attention to your students.
6.7.1 LECTURE OUTLINES
EVERYBODY:
At start of day
Flags
Rules
Gas
Courtesy
Instructor assignments
Beginners:
At start of day
Passing rules
Line
MCR
Late Apex
Consistency
Markers
Smoothness
Seating Position
After drive around in instructor car
Talk a lap of the track
Use whole track
Follow instructors
After each session
Discuss what students did right and wrong.
More advanced material as appropriate.
Intermediate:
At start of day
Review of beginner material
Friction Circle and weight balance
Threshold Braking
Advanced:
Tailor the lecture to the needs of the individual student.
6.8 GRADING
Some guidelines for grading follow. It is difficult to come up with
hard and fast rules for grading subjective subjects. For each subject,
I mention things to consider when grading, then list some grades with
actions or traits I consider indicative of someone earning that grade.
TECHNIQUE
Technique can be broken down into numerous sub-topics:
Line, Smoothness, Consistency, and Full use of the car's
abilities. Does the student use all of the track on the entrance and
exit of the turns? Does he make it to the
apex
? Does he
apex
in the right place? Does he brake, turn-down and
apex
in the same place every lap? Does he apply the controls smoothly and
progressively or is his driving jerky? Does he use all of the car
’s capabilities when braking and turning? Is he getting on the
gas before the
apex
and unwinding the steering wheel when exiting the turn?
The student's driving (and grades) should improve with each day on the
track.
Here are five benchmarks to help evaluate a student's abilities.
1 No idea of what an
apex
is, not smooth
2 Drives down middle of track, brakes in middle of turn
3 Knows what an
apex
is, sometimes makes it, uses most of track on
����������entrance
and exit.
4 Usually gets close to
acceleration
when apexing, uses most of track on entrance and exit.
5: Should be an instructor, not a student. Drives a perfect lap every
time.
These are what I would consider to be average grades per level of
experience:
First session on track 1.5
after first day 2.0
after second day 3.0
after third day 3.3
after fourth day 3.5
Novice permit
������������3.7
Instructor
��������������������
4.5
ATTITUDE
Is the student there to learn or just to get his ya-yas out? Is he a
hazard to himself or others? Is he thinking with his brain or his ego?
Does he...
think he should be the teacher, not thestudent.?
miss most lectures and/or argue with the instructor?
show up for lectures, but doesn't participate because his attention is
elsewhere?
listen to what the instructor has to say, then ask relevent questions?
JUDGEMENT
Judgement goes hand in hand with attitude. Students with poor
attitudes often show poor judgement. They attempt to do things which
are beyond their ability, are not allowed, or are just not safe. A
student with good judgement will avoid bad situations before they
become situations.
Does the student...
make illegal foolish Banzai passes?
start a pass under yellow?
lets the instructor drive his Ferrari, Dodge Viper, etc. and borrow it
in the evening?
make legal, but foolish Banzai passes?
complete a pass under standing yellow?
make illegal, but safe pass?
stay out of trouble?
doesn't even come close to getting into trouble?
REACTIONS
It is difficult to judge reactions without seeing how a student
handles a bad situation. A driver with good judgement will have far
fewer opportunities to use his reactions than one that is always
pushing his luck. When a situation does occur, does the student
respond calmly and correctly? Or does he freeze up or freak out?
Does he...
cover his face with his hands and slam on the brakes?
hold the wheel in a death grip and slam on the brakes?
correct for a slide, maybe fishtails a little bit?
remember to put in clutch and maybe hit the brakes when in a spin?
correct, but not over-correct, when in a slide?
put in the clutch and straighten the wheel, when in spin?
react to situations so quickly and smoothly that they never become bad
situations?
COURTESY
Is being on the track with him the next best thing to having the track
to yourself...Is he pleasant to share the track with? Does he hold up
traffic? Does he thank and acknowledge the workers?
Does he...
cut people off, and seldom or never use his mirrors?
wave people by on straight, then tromp on the gas?
notice when someone is behind him and waves them by?
wave at the workers at end of session?
see a faster car and is wave it by before the flagger can show him the
blue
��������flag?
pull into pits to let a pack of cars get by?
COMPARATIVE LAP TIMES
This section must be graded relative to the capabilities of
car. Although the student should drive fast enough not to be a hazard,
he should realize that doing it right is more important than driving
fast.
GCR (General Competition Rules) KNOWLEDGE
How well does the student know the rules?
Does he...
know what the GCR is?
know a few of the chapters of the GCR?
know where to where to look in the GCR to find the answers?
know and remembers the important sections of the GCR?
quote the GCR verbatim, noting the section number?
FLAG RECOGNITION
Does he...
know any of the flags?
pass under yellow or miss black flags?
become confused about what to do in Black Flag All and Red Flag
��������situations?
know all the flags, but has to think about them?
acknowledge the flagger when shown a flag?
instantly recognizes all flags and knows what to do?
Teaching Performance Driving
teachperfdrive.txt Time-stamp: ##2003-05-15 16:48:48 lrc##
THIS SECTION WAS JUST STUCK IN
It needs a lot of work, but I think that it has valuable information
in it. I need to include some of Nikka's comments about exercises for
looking ahead.
I've been teaching
performance driving
since 1989. I've never done itprofessionally, but I have taught with
several clubs, with many different styles and techniques of
instruction. What follows are my opinions based upon my
experience. Most of what I say will be most applicable to a school
teaching novice drivers 0-3 days of instruction. The student may only
take one day of instruction, or several. The student's goals can be
anything from a fun afternoon playing with their car to this being the
first step towards a competition license.
It is important to remember that there is a large and vital difference
between the techniques that will give the student the best instruction
possible, and the techniques that will give the student the best
instruction possible with the available resources.
When learning
performance driving
, the student faces two kinds oflearning, Intelectual (book learning)
and kinesthetic (body learning). Without an intellectual understanding
of why they should do something, the student will just be learning
techniques by rote, and it will be harder for them to internalize the
techniques. Also, while it would be ideal if the student could learn
the basics intellectually before getting to the track, in reality,
they won't fully understand the the physics until they feel it with
the seat of their pants.
It is important to remember that there is only so much that a student
can learn intellectually at a trackside drivers meeting before they go
on to course. All too often I see these meetings drag on for over an
hour as the instructor tries to impart 5, 10, 15 or more years of
driving experience in one dose, when the students are distracted by
being at the race track, thinking about how they are going to be the
next Juan Manuel Fangio, compounded with the fact that it is usually
simply difficult to hear the instructor over the myriads of background
noise.
The primary advantages of covering all the material in a group meeting
is that it guarantees that all the students will be exposed to the
core material, and that it frees up the other instructors to do other
things. Assuming of course that the other instructors don't have to
wait around during the meeting for their students to be assigned.
The ideal situation would be to have a lecture a few evenings before
the track date, in a quiet room, where the students can easily hear
the instructor, take notes and ask questions without it taking from
vital time taking care of all the various details that crop up at the
track. If it were possible to have one of these classroom lectures
ahead of time, I would suggest giving the students a pass whereby they
can leave the initial drivers meeting once the information critical
for the day has been covered.
Rather than trying to cover all the material in one shot at the track,
I would suggest prioritizing the material, and covering as much as can
be (as long as the critical stuff gets covered) in some shorter,
specified period of time.
I am considering the possibility of making a video tape that covers
all of the basic material that students could watch in the comfort of
their own home. I've written a book that covers this material, but it
can be difficult getting people to actually read. I'm also working on
a more interactive online version of the book.
Critical before going onto track:
Safety rules, flags, passing etc. ettiquette follow me signals Basics
of
line
.
Important to know: proper way to sit how to hold wheel fast turn down
Good to know: basic physics- wight transfer, circle of friction,
basically why we are doing this. How do you teach physics without
using scary terms or numbers?
Assigning instructors:
Sometimes trackschools assign students to individual instructors,
sometimes they just have a pool of instructors for each run group. The
problem with the latter is that it is too easy for the students who
most need help to get skipped over, and not get any help. At the very
least there should be some sort of assignment such that each student
has an instructor specifically keeping an eye on them. It is also
often a lot easier for the students who most need help, to ask
questions in small groups, rather than in front of the whole group.
If you don't have time to assign specific students to the instructors,
take a couple of moments at the brief initial meeting, to introduce
the instructors, mention what they are driving, and say a little about
their experience:
Larry's been racing since 1988 and teaching since 1989. His current
track car in a 1969 MGBGT, but he has track experience in everything
from a Honda stationwagon to a 280Z.
Then take a break to allow students a chance to pick and meet their
instructors, trying to keep the number of students per teacher fairly
constant.
If you have novice instructors, have them co-teach with a more
experienced instructor. They'll still be available to do lead-follow
on the track or ride along with the student, but the experienced
instructor can also keep an eye on them.
Learning on track:
Group download meetings after a track session can be very
valuable. However, I feel that they should be kept short so that the
students can have more time with their own instructors. Also, if the
downloads are schedules at the same time as the instructor's "play
sessions" students should be excused from the group meeting if they
have an opportunity to ride with their instructor. If there is some
issue in particular with a student, try to catch them as they come off
the track from their session. This could be done via a white board
with the car numbers of students that need to check in at impound
posted at the track exit.
There are various means of watching students and giving them
feedback. Each of them have advantages and disadvantages.
instructors watching from turns:
This has the advantage of keeping instructors "out of harms way", and
allowing more students on the track as you have fewer, or no,
instructors cars out there. Instructors can theoretically take written
notes and don't rely on their memory about who did what. Also,
instructors can listen to the students and hear who is properly
modulating their throttle and who is constantly on and off it. The
disadvantage is that by the time the student gets any feedback it's
half an hour to an hour later, and they've already finished the
session.
unassigned instructors on track:
Have instructors driving on the track with students. If they see a
student having a problem, they can signal a student to follow
them. They are also observing who does what during the session and can
give feedback at a group download. Students can make mistakes and
never have anyone around to notice them. Instructors have to be able
to see and remember car numbers, or at least something distinctive
about the car (an especial problem in marque club schools where
everyone is driving nearly identical cars).
lead and follow with one student:
This is my favorite way of teaching a student the
line
. It is theclearest way to show a student where to drive short of
grabbing the steering wheel from the passenger seat and steering the
car for them. When students follow the instructor it is a lot easier
for them to keep on the
line
and they are often able to be "towed around" thetrack significantly
faster than they can go on their own. It is important to let the
student pass and try the
line
on their own,before taking the lead again and reminding them of where
they should really be. All too often, students can become excellent at
following an instructor without developing the skills of finding their
own refernce marks.
lead and follow with several students:
If an instructor has several students in the same run group, it is not
possible to give them each the level of attention that a single
student will get. Have the students
line
up together, with theinstructor in front. It's generally best to have
the best student immediately behind the instructor, and the student
who needs the most help at the back of the group. Make sure that the
students stay as close to each other, and to you, as they comfortably,
and safely can. If they get too spread out, it is impossible for the
last student in the group to see what the instructor is doing. Let
each student follow for a lap or two then wave them by so that the
next student can follow immediately behind the instructor. You may
want to give the students the option of rather than passing you, just
pulling out and letting the other students in the group pass, and
falling in at the end of the group.
When the student passes the instructor, they can either keep back with
the group, or run ahead and fall in behind the next instructor and
group of students they catch.
riding with student:
While a lead and follow can be the best way of showing a student where
to put their car on the track, riding with them is the best way of
teaching them how to put their car there. Many students have
reasonably clean
line
s at the low speeds of their first day on thetrack, but have many bad
habits which will cause them problems when they start picking up
speed. Also, by riding with them you can tell if they make common
mistakes like too slow of turn in, not being smooth on the gas,
turning in, steering away from the apex, then turning back in and so
forth. Also, by riding with a student, you can tell them that they
missed the apex, and by how much, as it happens.
It is very important to not only tell the student what they need to
hear, but to shut up and let the student concentrate on their
driving. Don't overwhelm them with advice, you aren't going to be able
to correct all of their mistakes in one session, or even one
day. Concentrate on a couple turns, or a couple of skills each
session.
There are several exercises I've found to be very helpful for
students, when I'm riding with them. On their warm up and cool down
laps, I have them drive an exagerated
line
, and actually drive up onthe berms (unless it is raining), so that
they can feel where the edges of their car are. Once they get good at
that, I have them just barely tick the edges of the berm enough to
feel it, but not enough to upset the car.
The complement to this exercise is to have the student concentrate on
entering a turn all of the way at the outside of the track, waiting
for the turndown point, and making a quick clean turndown. Probably
the two most common mistakes of students are too slow of a turn-in,
and "cheating their turndown point", i.e. edging in to the middle of
the track before so that when they turn in, they are already several
feet from the edge of the track.
It can really help a student think ahead and focus if you have them
"teach you the
line
", and tell you what you should be doing about twoseconds before you
get there. Tell the students that they don't have to speak in complete
sentences, or even in English, but they should at least vocalize their
thoughts.
Every so often, a student just won't understand where you want them to
put their car. They may not see where you are pointing, they have
preconceptions, or just don't believe that the car will go there. In
these cases, it may be helpful to actually steer the car for
them. Before doing this, ask them for permission, and have them slow
down a bit extra as it is harder to steer from the passenger
seat. Often, feeling the difference of the improved
line
will help thestudent understand where they should drive and why.
Often, when a student is on a track for the first time, I have them
shift as little as they can. If they have a car with a broad
powerband, I have them leave the car in fourth gear as much as
possible, and concentrate on the
line
. I remind them that if they letroom build up beteen them and the car
ahead of them, then they have more room to drive fast in the turns
without being caught behind slower cars.
Once a student has a pretty good understanding of the
line
, have themalternate between driving as slow as they have to in order
to drive a perfect
line
, and driving as fast as they (safely) can. Thealternation of fast and
a little sloppy, and slow and correct is one of the fastest ways to
get them to reasonably fast and reasonably correct.
Another good exercise, for the student who is starting to push the car
a bit harder is to have them practice threshold braking. There are
usually a couple of places on a track where a student can safely lock
up the brakes, if there isn't any traffic near them. These are usually
turns with lots of runoff at the end of a straight. Have the student
make sure that there is no traffic behind them and practice threshold
braking, or using their ABS when it is clear.
videos of student:
I am just starting to use a camcorder at the track, and haven't fully
explored it's potential. Being able to go back and watch my own
line
sas shot with my in car camera is very helpful, as is being able to
take verbal notes while I'm driving. I've also had the chance to watch
videos that were taken by someone following me, and those were
extremely enlightening. I can see that videos taken while following a
student could be quite educational, especially for the student who
swears that they are hitting the apexes, when they are barely in the
same zip code.
student riding with instructor:
One very helpful way of showing a student not only what they should
do, but why, is to take them for a ride in one of the fast run
groups. Having the speed of the car carry it out to the edge of the
track on the exit of a turn, or going fast enough that you need to let
the car settle between lefts and rights in the esses can really help
bring home to the student why you tell them to drive a particular
line
. Remember, the point of this ride is to show the student how todo it,
not to scare them. There is also a fine line between demonstrating
your abilities and "showing off".
Taking a student for a ride can be a good opportunity to show them not
only how to do it right, but how to do it wrong. Show them the
difference betwen a very early and a very late apex. Show them how to
handle two (or four) wheels off at the apex. Tell them what you're
going to do, and make sure that you do it in a safe way.
---------------------
First day at track
credentials of instructor goals of student background of student
Go through critical, then important book learning
How to sit, hold wheel Basics of
line
(if time) circle of friction/weight transfer
Lead and follow session Exercises on warmup/cooldown laps of hitting
berms Work on
line
, student follow for a bit, then a couple laps on own,then follow
again
talking: stuff from important to know and good to know lists discuss
specific issues Once student has weight transfer/circle of friction
give the what to do when things go wrong lecture
Give student ride in instructors car in fast group Shows the student
why they need to do the things we are telling them Establishes
credentials of instructor
Instructor ride along make sure student keeps hands on wheel
de-emphasize shifting, heel and toe, just work on
line
Work on quick turndown
==================
Miscellaneous bits, that haven't been fit into the structure yet.
Logistics:
scheduling: sharing cars time for instructors to change cars time for
instructors to play
It is best if the day can be scheduled so that if the same person (an
instructor) or car (shared between two students) is going to be on
track in two different run groups, that there is at least one run
group between them. This isn't always possible, but it's something to
try to keep in mind.
Also, try not to schedule instructors to be in meetings during the
sessions that they are allowed to go and play on the track. Free track
time is not the only reason that people teach, but it is a major
incentive, and it's annoying to have to choose between going to
"mandatory meeting" and getting track time.
racing and teachin the same day
I've tried to both teach and race on the same day. I found it so
exhausting to teach in two run groups before racing that my
performance in the race was definitely affected.
Slow laps in the teacher's car before the students drive are of
limited usefulness. The students don't have a frame of reference to
hang what they are seeing on. These laps, later in the day, can be
very useful.
Students with particular issues:
Teaching women, how is it different?
All generalizations are false, especially ones about women. That
disclaimer aside, there are a couple of characteristics that I've seen
more frequently with women than with men. They tend to be less
aggressive, and more conservative on the track. They can have finely
perfected
line
s, but not only will they not push the car to the latestpossible
braking point, they may not even use full throttle on the
straights. This isn't really a problem, unless they are holding up
traffic and not checking their mirrors to let people past.
I'm not sure how to correct this, or if it even needs to be. I did
have a friend knock something like 20 seconds off her lap time at
Malibu Grand Prix after I took her for a ride in the two seater
car. Once she realized that the cars would take turns that much faster
without spinning out, flipping over and bursting into flames, she went
that much faster.
I think that a lot of this comes from the fact that very few women
consider their femininity closely tied to their ability to drive fast,
and as such have rarely, if ever, approached the handling limits of
their cars. I've seen a button that said "There are two things every
man thinks he does well, one of them is drive". But I've never seen
the same said of women.
Oftentimes a woman comes to the racetrack with little prior knowledge
or interest in
performance driving
. She may have just gotten a sportylittle car and wants to learn how
to drive it, or she may have been talked into coming out to see how
much fun her boyfriend's or husband's hobby is. She didn't grow up
reading car magazines, has never heard terms like apex, getting
sideways and lateral acceleration before. You may have to assume far
less background knowledge and explain a lot more. On the other hand,
she may have fewer bad habits to unlearn as well, and may have less
ego getting in the way of admitting that someone else knows more about
this than she does.
What to do with the student who is conviced that he knows more than
the instructor?
One thing that sometimes helps, is telling the student that while your
technique may not be the fastest way for the car that the student is
driving that day, one day they will likely be in a situation where by
having your techniques in their "mental toolbox", they'll be able to
pull them out and go faster. Also point out that when you are learning
a new technique, things will usually be worse before they get
better. Ask them to give your techniques a try for the day. If they
don't work, they don't have to use them ever again, but they may just
find the situation where it's actually handy to apex on the berm
rather than drive down the middle of the track.
Sometimes taking them for a ride at speed can help. Remember that you
aren't trying to scare the student, or show off per se, but if they
realize that you can actually get around the track faster in your
stock honda civic than they can in their camaro, you might actually
know something.
Sometimes, the chemistry just doesn't work between you. In which case
it is best to try to trade them with another instructor who may work
better.
Sometimes this student is just a hazard. They won't believe that they
are doing anything wrong (though vidoes of them missing the apex by a
car width may help) and continue to drive over their head. In this
case, it may be best to ask the student to leave, even if you have to
give them a full refund.
The student who is clue-immune.
Every so often you get a student that just doesn't "get it". They may
not understand english. They may have preconceptions. They may just be
slow at picking up new physical skills. For these students, you have
to ask the question "are they a hazard"? If not, it's often best to
just let them be, and maybe they will eventually get it.
How to teach physics without using numbers
For a lot of people it is a lot easier to learn what to do, if they
understand why they should do it. For
performance driving
, the "why"is basically physics. Unless your student is an engineer,
there's a good chance that if you describe the physics using physics
terms and formulas, their eyes will just glaze over. Describe the
effects qualitatively rather than quantatively. Use small words, that
may not be quite so technically accurate, but which are easier for
non-technical people to understand.
What props to get or use.
Fast
line
vs. school (safe)
line
.
I prefer to teach a
line
that has the apexes later than I would use ina race. I'd rather have a
student, when they start pushing their car, have a little bit of
leeway in their
line
. If they try for a late apexand apex earlier than they want, they end
up on the racing
line
. Ifthey try for the racing apex and apex earlier than they want, they
end up on the tire wall.
Exercises off the track:
Before going out on track, have students mime a fast turndown. They
may feel like idiots standing around the paddock pretending that they
are going from straight to turned, then slowly letting the wheel out,
but it helps them get it into muscle memory.
If you can set up a couple of cones for them to drive through in an
empty stretch of paddock, then move them closer, the students can
learn the actual width of their car.
benefits of teaching: free track time learning to critique driving
recognizing your own mistakes giving back to community helps organize
your own thoughts about driving
teaching is not about the teacher, it is about the student
Copyright (C) 2003 Larry Colen
Most recently modified by lrc at Tue Jul 15 01:16:41 PDT 2003