SECTION 7
COURSE and TURN DESCRIPTIONS
7.1 SEARS POINT, TURN BY TURN
One of the things that makes Sears Point both challenging and a good
course for learning, is that most of the turns must be addressed as
part of a sequence of turns, rather than as individual turns.
To emphasize this point, the track description is broken into sections
of the track rather than artificially isolating each individual
turn. Arguably, the track could be divided into three parts: the upper
track, the Esses and turn 11. Instead I used the short straights on
the upper track to break it into four sections. These sections are not
really isolated; you should use the exit from each to set your car up
for the next.
For the purposes of passing, in a driving school there are usually
considered to be three straights: The exit of the carousel(turn 6) to
turn 7, the exit of turn 10 to the entrance of turn 11 and the exit of
turn 11 to the entrance of turn 1. Even so, two of these straights
have turns (turn 12 and the dogleg) in the middle of them. From the
standpoint of choosing a line, two of the turns (5 and 9) are
considered straights. Yes, there is an apex, but the car is flat out
the whole way. In cars that have a lot of handling and not much power,
even the esses can be considered to be a straight.
map of whole (old) track
 Map of infineon raceway as of 2003.

TURNS 12-2
When you enter the track from the hot-pits, it will be at turn
12. Whenever you enter a racetrack ALWAYS check for traffic. If no one
is there, checking won't hurt anything, if someone is coming up fast,
not checking will.
Turn 12, the forgotten turn, is at the end of the pitwall, where the
straight after turn 11 meets with the drag strip. It is included in
the upper track section because the set of the steering you take in
turn 12 is carried all the way past the bridge in turn 1.
As you drive past the pit wall, turn your wheel to the least steering
angle which, without changing the angle of the wheel will carry you in
one smooth arc under the S/F flagger. Apex on the left just past the
rough spot where the upper part of the course leaves the drag strip.
Under powered cars will apex all of the way to the left side of the
track, the line for more powerfull cars will have them apex as much at
five feet to the right of the left edge of the track. In the rain
modify your line to avoid the puddle at the apex.
Your speed will carry you to the outside edge of the track just before
the bridge. Continue this gentle arc, which will bring you back
towards the left side of the track, until the steepness of the track
increases.
The principle we are using here is the sharper the steering wheel is
turned, the more speed you scrub off with your front tires.
When the track is wet there will be puddles in the line under the
starter stand and at the apex at the bottom of the hill. The wet line
is modified to stay on the drier pavement. When the track is damp (the
line has dried) be very carefull about getting off of the line to
pass. If you hit the puddle, even the gentle turn you are doing will
be enough to cause a spin.
When the track steepens, there will be much more "weight" forcing the
tires to the pavement. This will give them better grip, allowing you
to turn-down more to line up for the entrance to turn 2. Line up as
far to the left side of the track as possible while staying parallel
to the short straight leading into turn 2. As the car settles on this
straight, downshift. In many cars, lifting your foot for the downshift
will be the first time you are not under full acceleration since
before the apex of turn 11.
The principle being used here is that the increasing steepness of the
track adds more weight to the wheels, giving the car better
traction. If the lines are properly set up and executed, going all of
the way to the right hand side of the track after the bridge, almost
every car will be able to take this turn flat out.
In a car with a lot of horsepower, it may be necessary to follow the
right edge of the track until the steepness starts to increase. If you
are going fast enough, the added weight on the tires will be needed to
get turned properly to line up on the left side of the track before
entering turn 2. It is important to remember it is the speed exiting
turn 2 that is important, not the speed going into it.
Turn 2 can be frightening. It is blind, off camber, and at the top of
a hill. In the late afternoon, the sun is directly in your eyes making
it almost impossible to see even what isn't obstructed by the hill.
Get lined up on the left side of the track, and turn-down at the "1"
marker. Since you cannot see the apex, you have to aim your car based
upon things you can see. A good landmark is the pole with the
loudspeakers on the hillside. Apex a little bit past the crest of the
hill, about 2/3 down the FIA curbing. Let your speed carry you across
the track to the dragons teeth (the small red and white cement
speedbumps) in the FIA curbing on drivers left. Use all of the road on
the exit. Even if your speed doesn't carry you out there, open up your
steering so you use the entire width of the road.
More than 80 percent of new drivers make the mistake of not using the
whole road on the exit. This slows them down because their wheels are
turned more than necessary which just converts their speed into rubber
dust. It then slows them down even further because they are not
properly set up to enter turn 3.
If you are having trouble with the sun in your eyes on this turn, put
a strip of tape across the top of your visor, just above your normal
field of vision. When the sun is in your eyes, tip your head down,
letting the tape shield your eyes from the sun.
If you apex too deep or early in turn 2, your inside wheels will
solidly hit the steep berm on the inside of the turn. The centrifugal
force, combined with hitting the berm, can launch a car onto 2 wheels,
or possibly all of the way over. It is very important to late apex
this turn.
Reference Points, Turn 12
Gear at entrance Shift to gear
Braking Point
Turn-Down Point
Apex
Exit
Reference Points, Turn 1
Gear at entrance Shift to gear
Braking Point
Turn-Down Point
Apex
Exit
Notes
Reference Points, Turn 2
Gear at entrance Shift to gear
Braking Point
Turn-Down Point
Apex
Exit
Notes
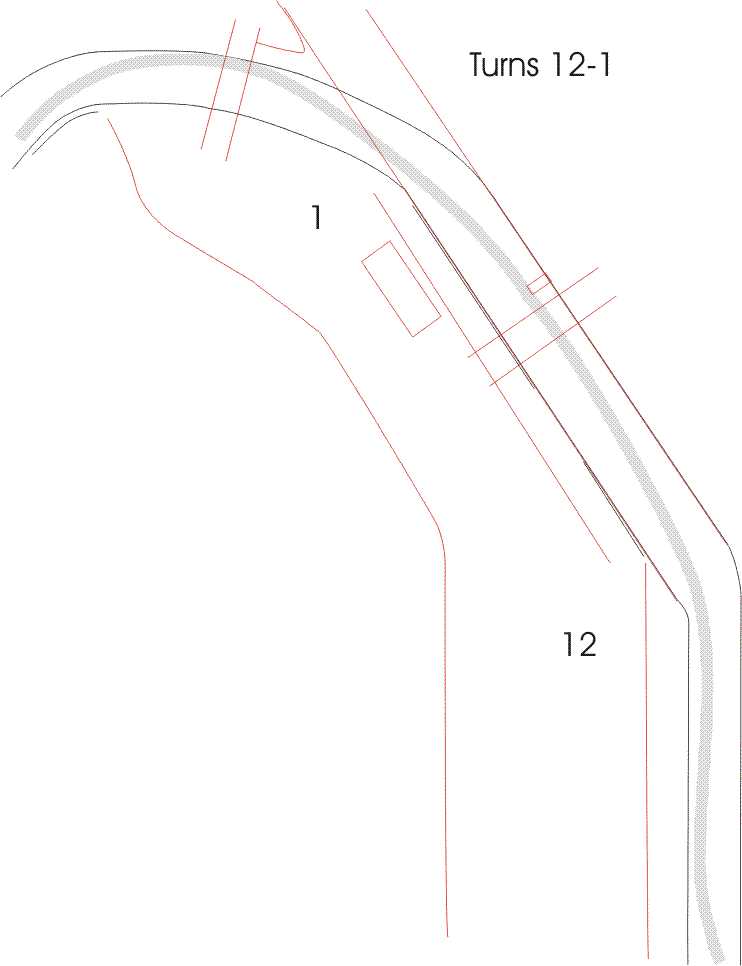
picture turns 12-1
picture turns 2-3a
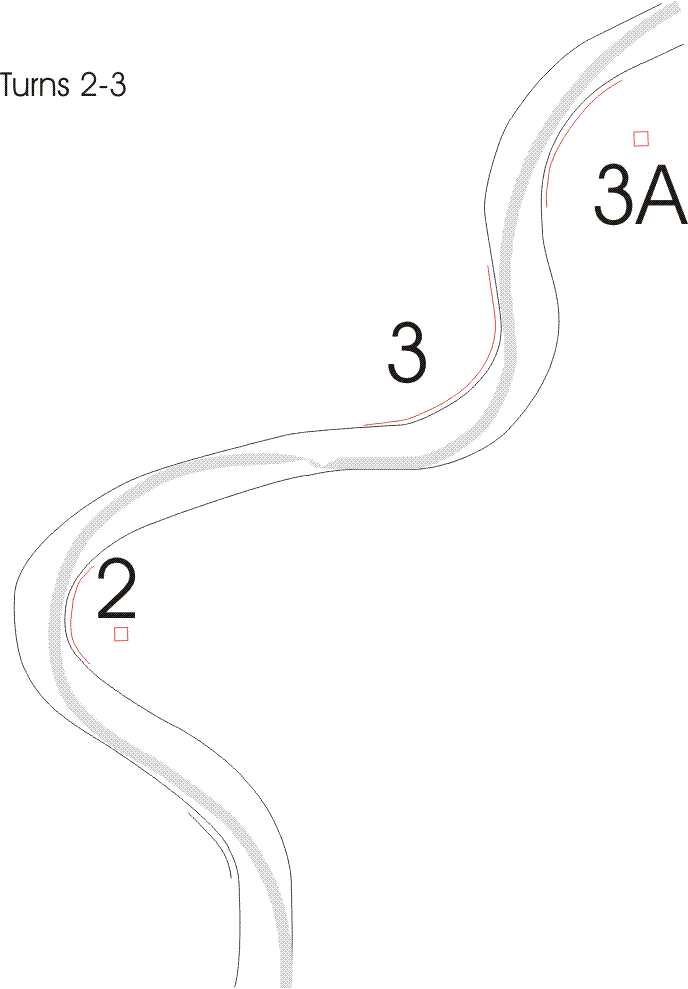
TURNS 3, 3A
Coming out of turn 2, continue your arc so you line up on the short
straight before the turndown of 3. This lets you enter turn 3 with
your car straight and the suspension settled.
Going downhill into turn 3, the turndown point is where the pavement
on the right starts to curve. Start turning at this point. Shortly
after this, the track levels out and starts uphill. This curvature,
like that in turn 1, will push the car into the track, giving it
better traction. Turn your wheel so you are dialing in more steering
as the car gets more weight on the tires.
The apex for turn 3 is where the FIA curbing on the left straightens
out. Rather than briefly touching the left hand side of the track
here, follow the curbing for a beat (one to two car lengths). You need
to do this to set yourself up for turn 3A. This is a classic example
of sacrificing the line through one turn to get a better line on the
following turn, which leads out onto a straight, and is therefore more
important.
About two car lengths after the apex of turn 3, your left front tire
should be about six inches from the left hand side of the track. This
is your turndown marker. There is probably still a dot of paint on
the track there from when Bondurant taught at Sears Point.
Even more than turn 2, turn 3A is blind. There are some poles and a
media box on the hill you can use as aiming points. When I reach the
turndown point for 3A (about one car length past the apex of turn 3),
I aim for the end of the berm at the top of the hill. The geography is
such that you have to learn what things are supposed to look like as
you come over the hill and across the track. Apex turn 3A just past
the top of the hill, exit all of the way to the left side of the
track. Continue down the left side of the track into the entrance for
turn 4.
Turn 3A is place where people take the classic Sears point two wheels
in the air picture at Sears Point. As at turn 2, the car is launched
into the air by apexing too early and driving high up on the berm.
If you feel that you could take turn 3 flat out, except that your car
has a tendency to understeer at the turndown, briefly and smoothly
lift off the gas as you turn-down. This gives added weight (and
traction) on the front tires as you turn down.
If your car has a lot of power and you must lift or brake for turn 3,
do so smoothly. A jerky lift of the throttle, or stab of the brakes
will upset the cars suspension and could cause a spin.
If it doesn't mean overreving your motor too much,you will probably be
better off not shifting up into fourth gear between turns 2 and 3. As
soon as the road starts uphill, the car will slow down and need the
extra gearing to maintain its speed.

map of turns 3-6
Reference Points, Turn 3
Gear at entrance Shift to gear
Braking Point
Turn-Down Point
Apex
Exit
Notes
Reference Points, Turn 3A
Gear at entrance Shift to gear
Braking Point
Turn-Down Point
Apex
Exit
Notes
TURN 4
Going into turn 4, get all the way over to the left side of the
track. The braking point will be somewhere between the "3" and the "2"
markers. Get completely off the brakes by the
“1" then turn-down quickly. Apex about two-thirds around the
berm. The exit point is toward the end of the dragon's teeth. You may
want to stay off of the berm at the exit as it will
‘grab
’ the tires of some cars.
The critical and difficult portion of turn 4 is the turndown. It is
psychologically difficult to turn the wheel far enough and fast enough
at the turndown point. The natural tendency is to turn-down too
slowly. If you turn-down too slowly too soon, you will early apex the
turn. If you turn-down too slowly but at the right time, you will miss
the apex. The other reason people miss the apex at turn 4 is they
don't slow down enough at the entrance.
If you haven't mastered heel-and-toe downshifting, you should probably
not downshift for turn 4. It is on a steep downhill and not
downshifting should not cost you much time.
Reference Points, Turn 4
Gear at entrance Shift to gear
Braking Point
Turn-Down Point
Apex
Exit
Notes
TURNS 5-6A
To all intents and purposes, Turn 5 is a straightaway with an
apex. From the exit of turn 4, turn the wheel once so that under full
acceleration one smooth arc will bring you to the apex, then back
across the track about two-thirds of the way to the left side of the
track nd will line you up for a straight entrance into the
carousel. Aim your car at the snack shack on the hill behind turn 2.
Crest the hill about 1 car width from the right side of the
track. After the car settles and has weight on its wheels, brake for
the Carousel in a straight line. If you are going too fast to
comfortably wait until after the crest of the hill to brake, then
brake before the crest of the hill, but let off the brakes slightly
when there is little or no weight on the wheels at the top of the
hill.
Start the turndown before you get to the edge of the track. At the
time of writing, there was a paint spot exactly where you want your
right front tire to be when you turn-down. Cross under the bridge
about one cars width from the left edge of the track. The change in
slope at the bottom will help the car around the turn. The apex is a
little before the bottom of the hill. The exit of 6A brings you across
the track at about the rough pavement.
The inside line around 6 also seems to work just fine. It is a long
enough turn that there is no particular fast line, at least not that I
have found. Corollary: Within reasonable limits there isn't a
particularly slow line either. Stay out of the marbles and off the
dirt. If the car is fighting and complaining, there is probably a
smoother way around. Find it. I often found (based on RPM at the exit)
it wasn't worth fighting the car to make the apex. If I had been going
faster, I might have run out of track at the exit though.
Turn 6 is a good place to learn how getting on the gas and the change
of slope of a track can both improve a car's stability.
Reference Points, Turn 5
Gear at entrance Shift to gear
Braking Point
Turn-Down Point
Apex
Exit
Notes
Reference Points, Turn 6
Gear at entrance Shift to gear
Braking Point
Turn-Down Point
Apex
Exit
Notes
Reference Points, Turn 6A
Gear at entrance Shift to gear
Braking Point
Turn-Down Point
Apex
Exit
Notes
THE DOGLEG
After exiting 6A to the rough patch of pavement, continue the arc so
that you clip the dogleg apex then line up with the left edge of the
track. Follow the left edge of the track until you could drive a
straight line to the left side of the sign without driving off the
right side of the track. Now, drive in a straight line towards the
left side of the sign. Before you run out of pavement and drive into
the dirt, and brake in a straight line.
By driving this straight line, you minimize the speed scrubbed off by
turning the wheels. This straight is uphill, so conserve as much of
your speed as you can.
TURNS 7-8A
Turn 7 is the start of the Esses. It is a decreasing radius turn at
the end of a straight. At the
“1" marker, smoothly let off the brakes and turn-down. This will
have you rotating deep enough in the turn so you will be able to get
onto the gas long before the apex. The apex to turn 7 is on the FIA
curbing, past the break for the dragstrip. Exit to the left edge of
the track towards the end of the curbing.
Come a little bit over to the right to set up for the left
hander. Apex onthe left about two-thirds of the way down the
curbing. Make this a late apex to allow you to set up for the right
hander that follows. Between the left turn and the right turn,
straighten the wheel and let the car settle.
Apex the right hand turn just past where the access road meets the
track. Follow along next to the armco for about a car length. Again,
the steering wheel should be straight, to allow the car to settle.
Again, take a late apex in turn 8 (the left hander) to set up for 8A
(the right hander) since turn 8A effectively leads onto a straight and
is therefore the more important turn. Again, it is important to
straighten the wheel for a beat and let the car settle between turns 8
and 8A.
Apex 8A about two-thirds of the way down the berm and make sure you
exit all of the way to the left hand side of the track. When you first
start coming through, you will not be carrying enough speed to need
the whole track. As your skill and confidence increase on the earlier
portion of the Esses, the speed you carry through 8A will carry you
all of the way to the outside of the track. It is important that you
get used to being there. Besides, keeping the wheel turned sharper to
keep the car on the inside just scrubs off what speed you do have.
The entrance of 7 is a good place to practice threshold
braking. Because it isat the end of a fairly long straight, most cars
are carry a lot of speed going into it. The entrance of turn 7 is also
one of the few places at Sears Point that has a lot of runoff. Making
sure there is no one immediately behind you, apply your brakes as hard
as you can, hard enough to lock up your wheels. When your wheels lock,
let off the brakes just enough to unlock them. Practice braking so
that your wheels are on the threshold of lockup. This is called
"threshold braking". Most people do not realize how much braking their
car is capable of.
When practicing threshold braking, if the car is not slowing down
enough to make the turn, keep the steering wheel straight and drive
straight off of the track. When you exit the track, let off the brakes
enough that the wheels do not lock up in the dirt. When the car has
slowed enough, turn the car around, make sure that traffic is clear,
and drive back onto the track.
Some warnings about this exercise:
Do not drive off of the track with the steering wheel turned. If the
dirt is soft, or you hit the sand trap, this could cause your car to
roll. Wait until the car has slowed enough to turn around safely.
Try not to get stuck in the sand trap.
Do not do this exercise when the ground is soft and muddy. You could
get stuck in the mud or bring a bunch of it back onto the track. If
you do go off into the mud, try to stay off of the line until most of
it has fallen off of your car. The other drivers will not appreciate
mud and dirt being dropped onto the line. For that matter, a lap
later, you won't either.
The Esses are a good place to learn the rhythm of the track. Remember,
it is important to let the car settle between each turn.
Reference Points, Turn 7
Gear at entrance Shift to gear
Braking Point
Turn-Down Point
Apex
Exit
Notes
Reference Points, Turn 8 Left
Gear at entrance Shift to gear
Braking Point
Turn-Down Point
Apex
Exit
Notes
Reference Points, Turn 8 Right
Gear at entrance Shift to gear
Braking Point
Turn-Down Point
Apex
Exit
Notes
Reference Points, Turn 8A Left
Gear at entrance Shift to gear
Braking Point
Turn-Down Point
Apex
Exit
Notes
Reference Points, Turn 8A Right
Gear at entrance Shift to gear
Braking Point
Turn-Down Point
Apex
Exit
Notes
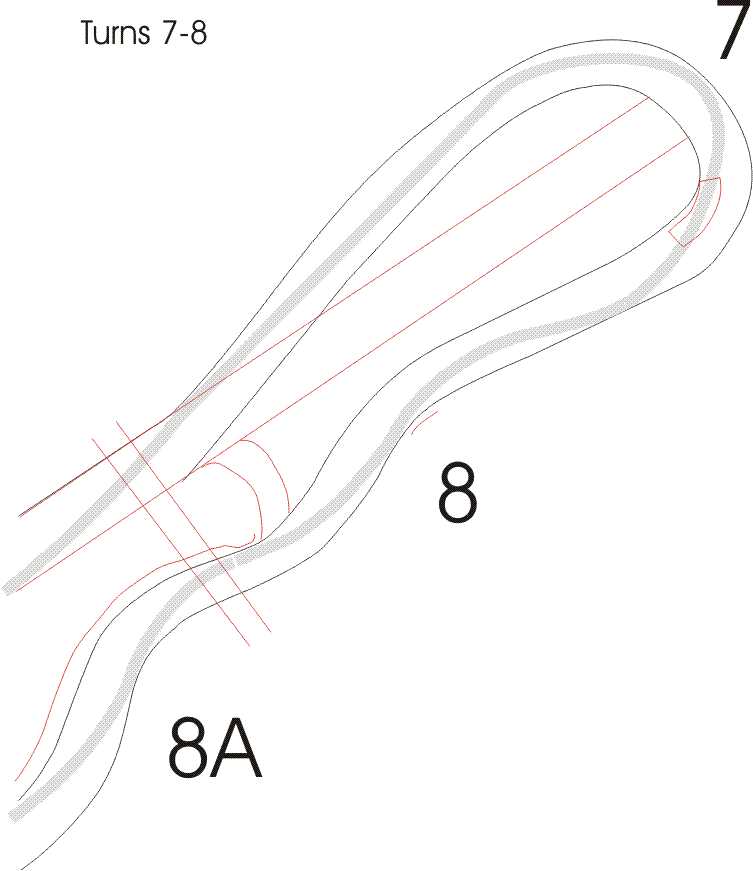
map of turns 7-8a
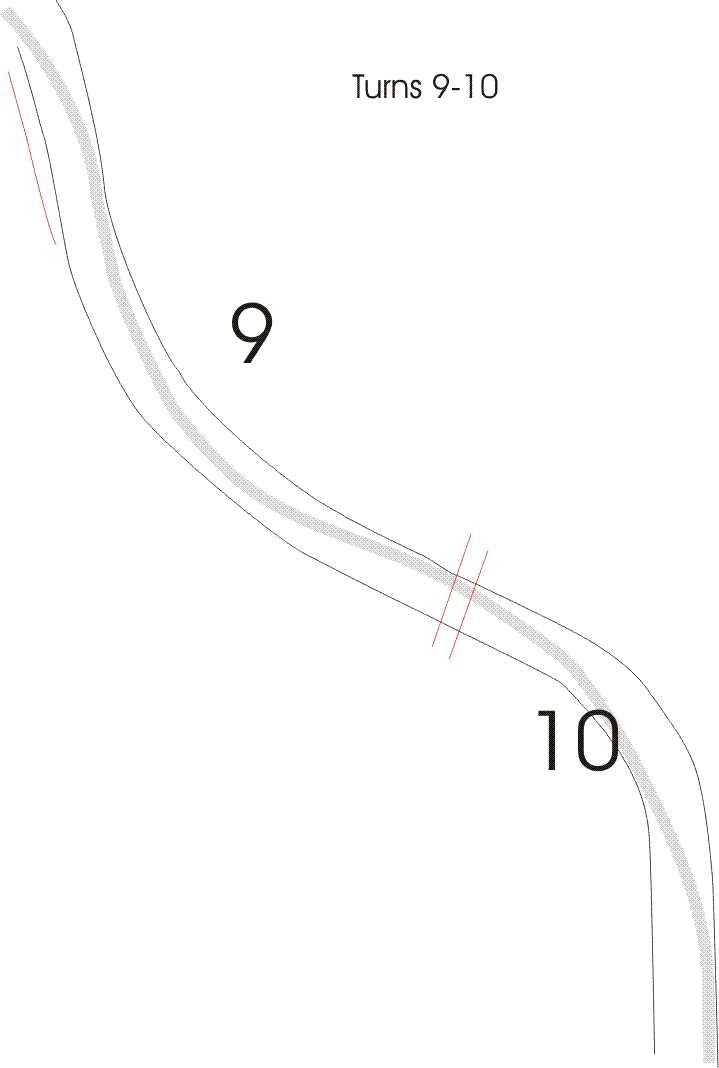
TURNS 9-10
Treat turn 9 as a straight to prepare you for turn 10. The exit of 8A
will bring you all the way to the left side of the track. Follow the
inside (left side) of the track until it starts to turn away. Turn the
wheel just enough so your arc will carry you one-half to two-thirds of
the way across the track and will line you up for the entrance of turn
10.
Enter turn 10 on the left side of the track. Before the track turns
to the right, and just before the bridge, is a short straight section
. Line the car up parallel with this straight section with the car all
of the way to the left.
Just before this straight section, on the left edge of the pavement
there is a corner where the left edge of the track makes a slight
left. The turn-down point is somewhere along this short straight
section of track, depending upon the car, and how much speed it is
carrying. The faster you go, the earlier you need to turn-down to
make it to the apex. If you turn-down too slow or too late you will
miss the apex. If you turn in too early or too quickly, you will apex
early and will not be able to get back on the gas as soon. Once the
car is turned down and is aimed for the correct apex, remember to put
your foot back on the gas. For some reason, when you are doing 90-100
mph through turn 10 it is easy to forget to add throttle.
The apex to turn 10 is about two-thirds of the way down the berm. It
is marked by a small drainage hole. After the apex, allow the car to
exit all of the way to the edge of the track. When you are do the
Esses properly, you will carry enough speed through turn 10 to carry
you all of the way out to the edge of the track. Even when you do go
fast enough that you have to use the whole track, let the car go out
there. It is important to know how to drive the course from where you
will be winding up, so that you will be able to do it right when you
get there.
If you do not turn-down enough at the entrance, you will miss the
apex. In this case, the speed that would carry you all of the way to
the outside edge of the track will carry you
past
the edge. If you go off of the track in turn 10, keep the steering
wheel straight. DO NOT suddenly lift off of the gas (this will cause
you to spin). Drive smoothly back onto the track.
Many small cars need no more than a brief lift off the throttle at
turn-down. This "confidence lift"puts weight on the front tires to
help the car turn.
Reference Points, Turn 9
Gear at entrance Shift to gear
Braking Point
Turn-Down Point
Apex
Exit
Notes
Reference Points, Turn 10
Gear at entrance Shift to gear
Braking Point
Turn-Down Point
Apex
Exit
Notes
map of turns 8A-9
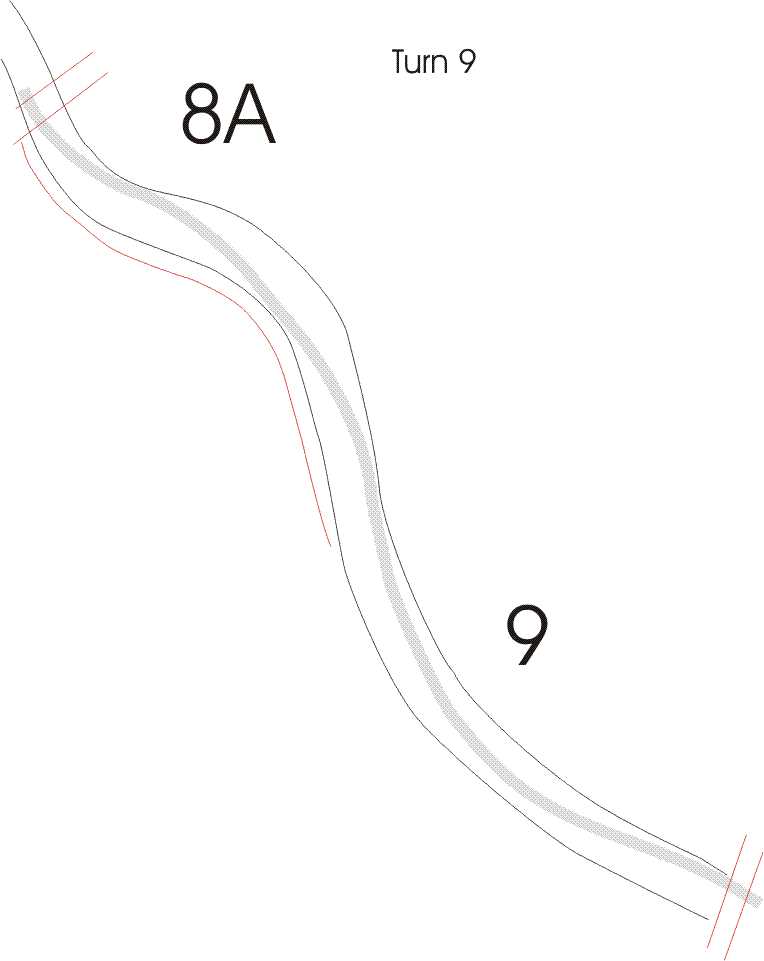
map of turns 9-10
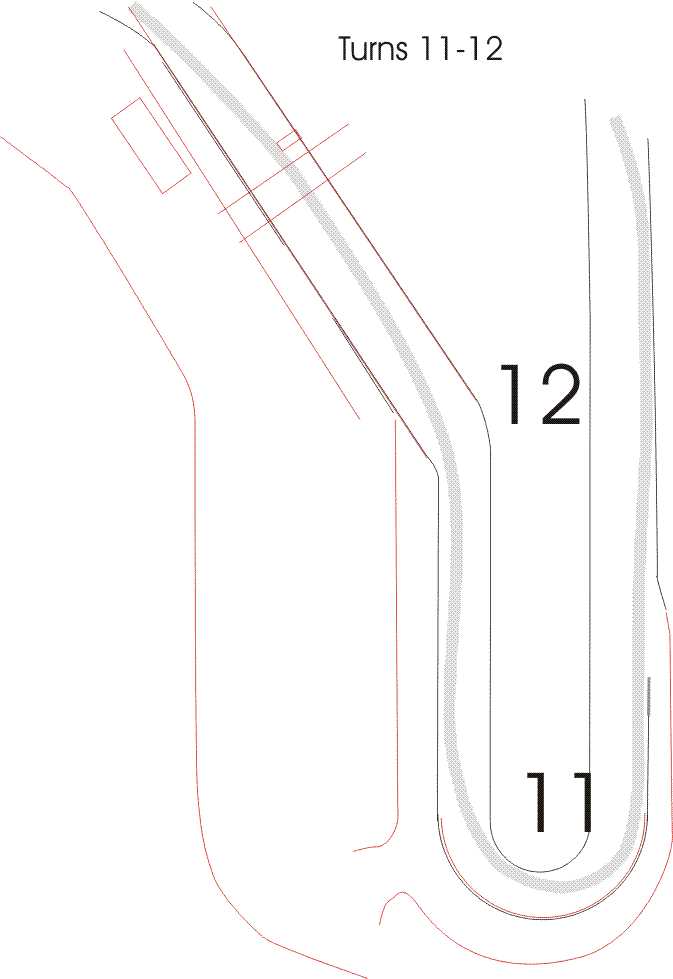
TURN 11
Turn 11 is a classic hairpin turn between two straights. It is very
important to use all of the track on the entrance and exit. Since it
is a right hand turn, that puts the walls right next to the
driver. There is no excuse for not using the whole track because not
only can you easily see the edge of the track, you can darn near touch
it with your elbow.
There is a turn-down marker painted on the track near the end of the
tire wall. Turn down here. In the dry, apex all the way in across the
red and white paint as near to the tires as you can get. In the wet,
the paint is very slick and it is best to stay off of it. When this
turn is done properly, the car is under heavy acceleration before the
apex.
There are all sorts of paint and tire marks on the pit wall marking
where you should exit the turn. Use all of the road on the exit and
accelerate up the straight to turn 12.
A classic problem in turn 11 is not slowing down enough on the
entrance. If you cannot hit the apex, chances are you are either not
slowing down enough, or are not turning down
quickly
enough. Note that I said
quickly
, NOT
soon
. The difference being how much time it takes you to go from having
your wheels straight, to having them turned as much as needed versus
when you start to turn the wheel.
In the wet, it may be necessary to enter turn 11 about one car width
in from the edge to avoid puddles.
map of turns 11, 12
Reference Points, Turn 11
Gear at entrance Shift to gear
Braking Point
Turn-Down Point
Apex
Exit
Notes